Whoever signs in to your digital signage CMS can put anything on every screen, so protect the sign-in the way you protect email. Four controls do most of the work:
- Two-factor authentication (an app code or a passkey) for every member, not only admins.
- Single sign-on, so a person your IT team switches off loses access to the screens too.
- Roles that limit each person to their own locations.
- An audit log that records who changed what.
When you compare vendors, ask whether two-factor can be required for everyone, which identity providers and protocols single sign-on supports, whether it costs extra, and how a leaver is signed out.
In Brix every one of these starts in Settings > Security, top to bottom: Sign-in policy for everyone, Single sign-on, Passkeys, Two-factor authentication and Sign-in methods. Brix always keeps one working way into your own account, so nothing here locks you out. Brix single sign-on uses OpenID Connect (OIDC). It does not support SAML.
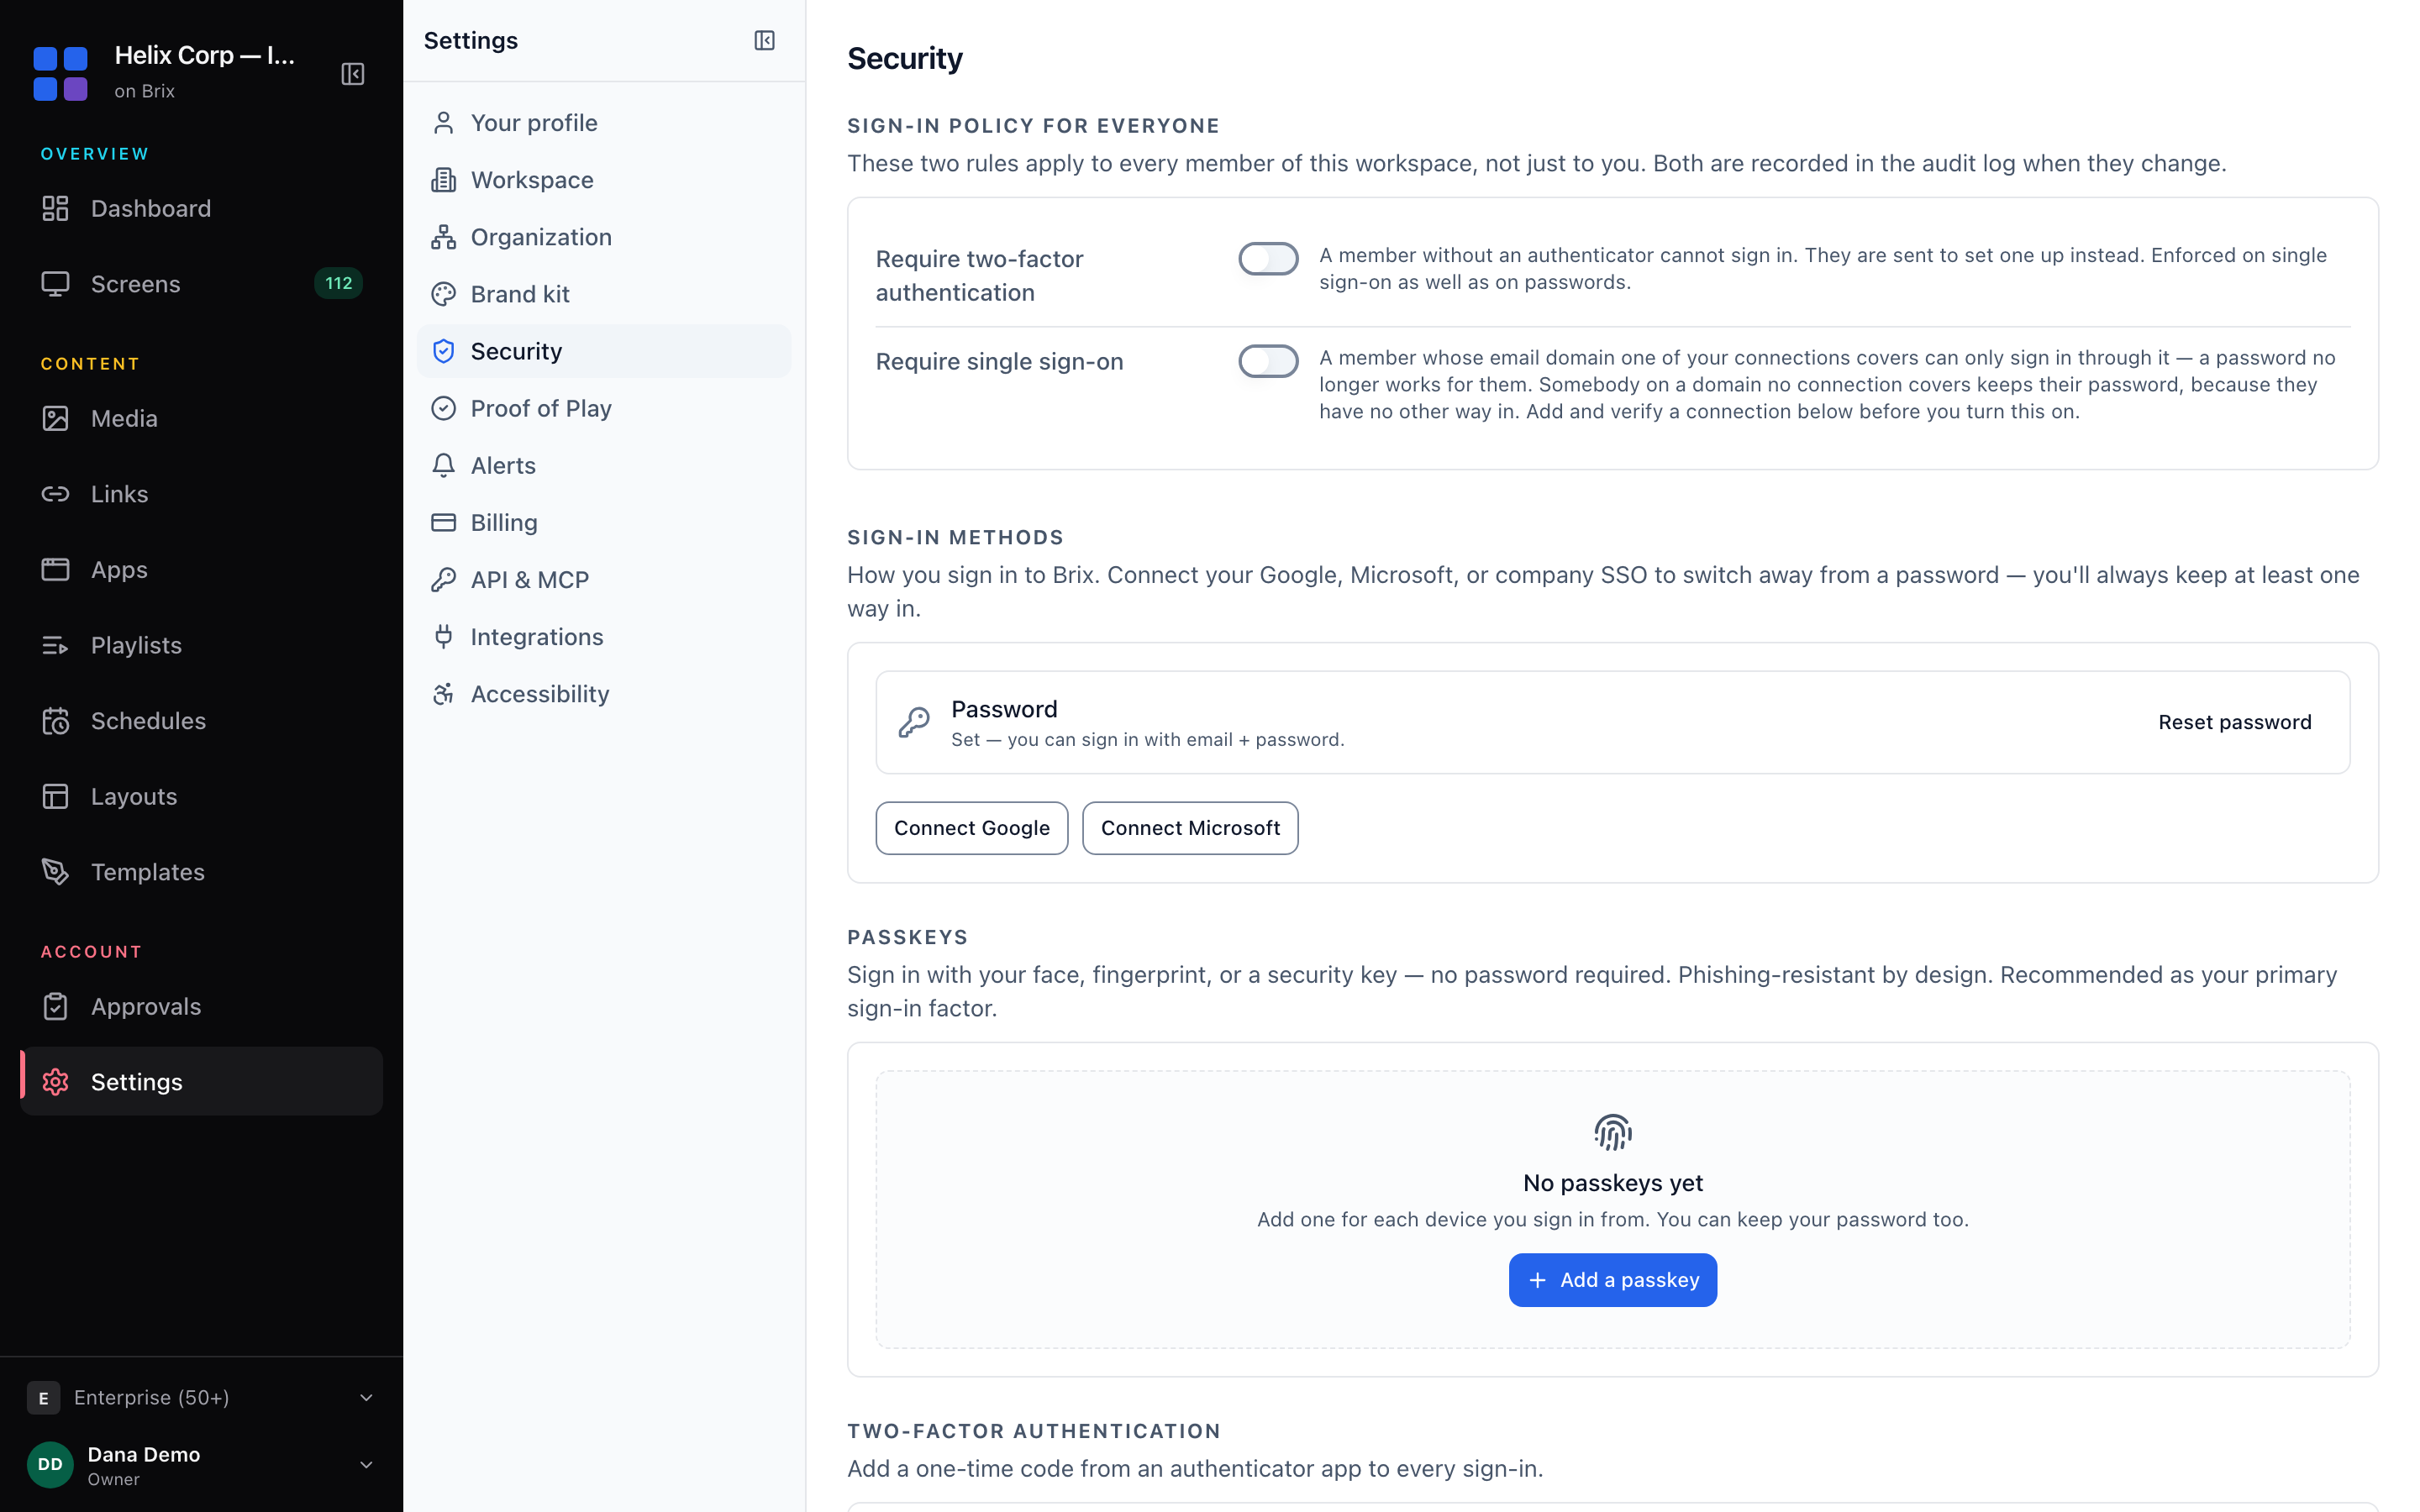
Require two-factor authentication for everyone
- Set up two-factor or a passkey on your own account first (below). Brix refuses the rule until you have one, because it would lock you out at your next sign-in.
- Open Settings > Security. Under Sign-in policy for everyone, turn on Require two-factor authentication.
A member then signs in with an authenticator app or a passkey. A member with neither is sent to set up an authenticator app during their next sign-in, and sees their recovery codes there. The rule applies to passwords and to single sign-on. Only a person who can edit workspace settings can change the switch. The audit log records each change.
Turn on two-factor authentication for your account
- Scroll to Two-factor authentication and select Set up.
- If your account has a password, type it and select Continue.
- Scan the QR code with your authenticator app (for example Google Authenticator or 1Password), or copy the key under Or enter manually.
- Type the 6-digit code into the Step 2 field and select Verify & turn on.
- Select Copy all to copy the ten recovery codes, store them somewhere safe, then select I saved them.
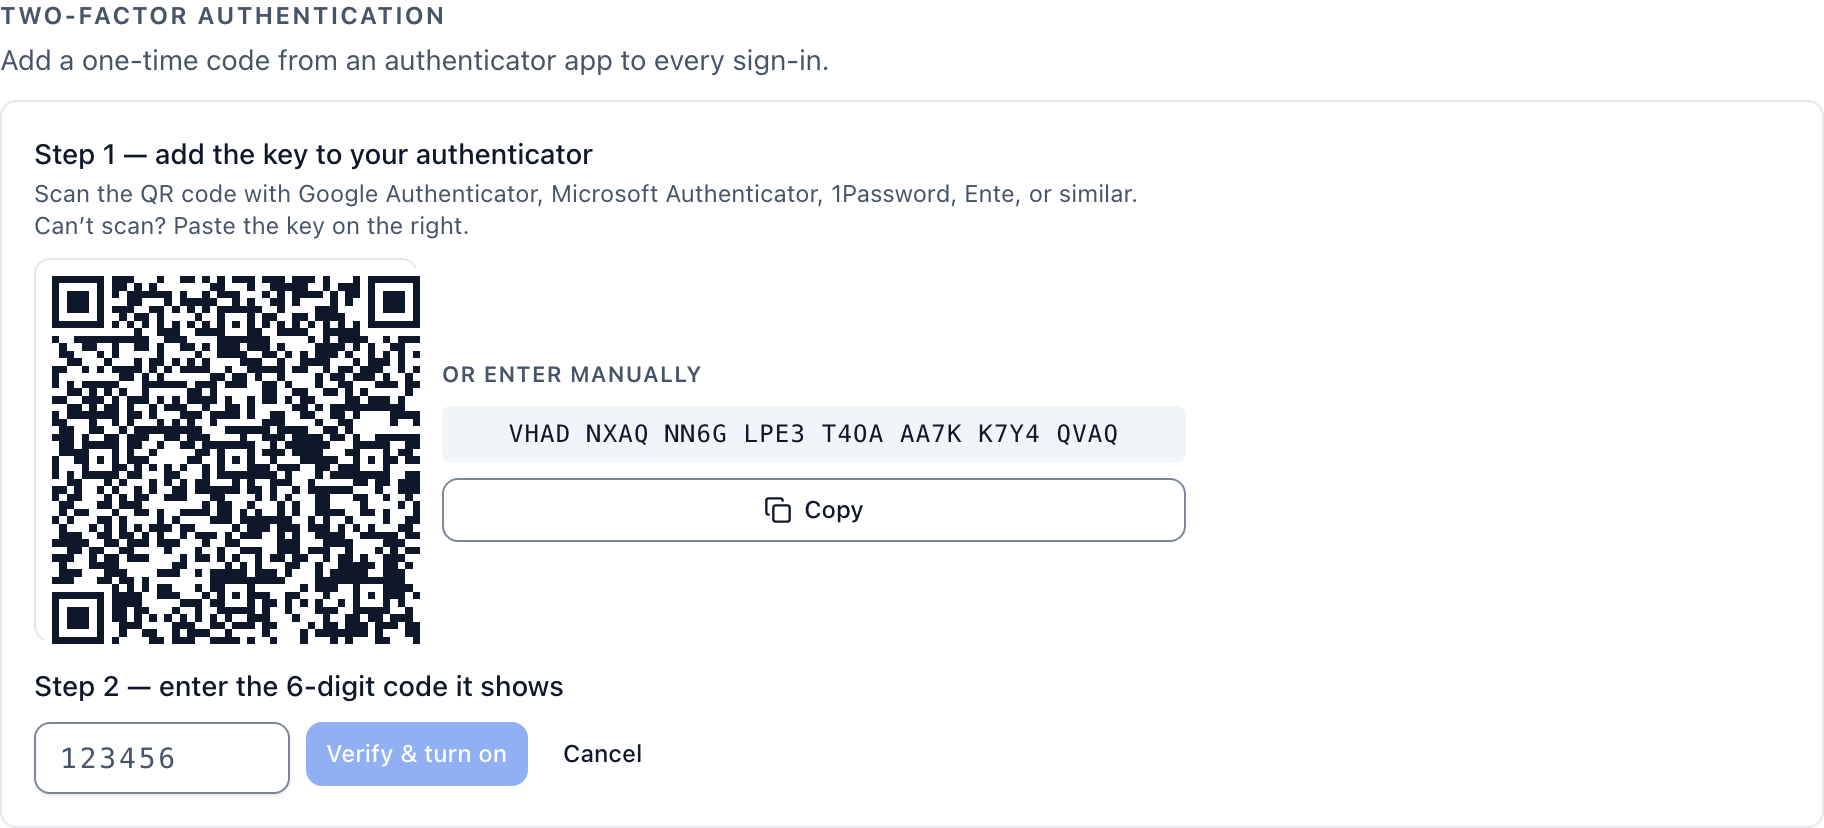
Brix shows the recovery codes once. Each works one time: type it into the 6-digit code field at sign-in when you cannot reach your app. To turn two-factor off, select Turn off and type a current 6-digit code.
Add a passkey
- Scroll to Passkeys and select Add a passkey.
- Type a label such as
Work laptop. - If your account has a password, type it into Confirm your password (and a two-factor code if two-factor is on).
- Select Create passkey and approve the prompt from your browser or device.
A passkey signs you in with your face, fingerprint or a security key, and meets the Require two-factor authentication rule. Add one for each device you sign in from. A passkey does not replace your password: both keep working. To remove one, select the trash button on its row, then Remove.
Connect Google or Microsoft
- Under Sign-in methods, select Connect Google or Connect Microsoft.
- Sign in at the provider and wait for the browser to return to Settings > Security.
One Google or Microsoft account belongs to one Brix user. To disconnect, select the trash button on its row, then Disconnect. The button stays disabled while that identity is your only way in.
Set up single sign-on for your company
A single sign-on connection sends every email address in your domains to your identity provider. Brix works with Microsoft Entra ID, Google Workspace, Okta, Auth0 and any other OpenID Connect provider (Generic OIDC). Single sign-on is included in the per-screen price. To plan who gets which role and locations, read single sign-on for digital signage.
- Scroll to Single sign-on and select Add SSO connection.
- Type a Display name (it appears on the sign-in button as "Continue with ...") and choose your provider in Vendor.
- Paste the Issuer URL and select Test to check it.
- Paste the Client ID and Client secret from your provider's app registration. Brix stores the secret encrypted and never shows it again.
- Type your Email domains, separated by commas.
- Leave Create a new account the first time a person signs in and Enabled ticked, then select Create connection.
- Select Copy beside Redirect URL for your IdP and paste it into the redirect URI field of your provider exactly as shown.
- For each email domain, add the DNS TXT record the connection shows and select Check DNS. Nobody can sign in through the connection until every domain reads Found.
- Select Test sign-in. It opens your provider and comes straight back, and you stay signed in.
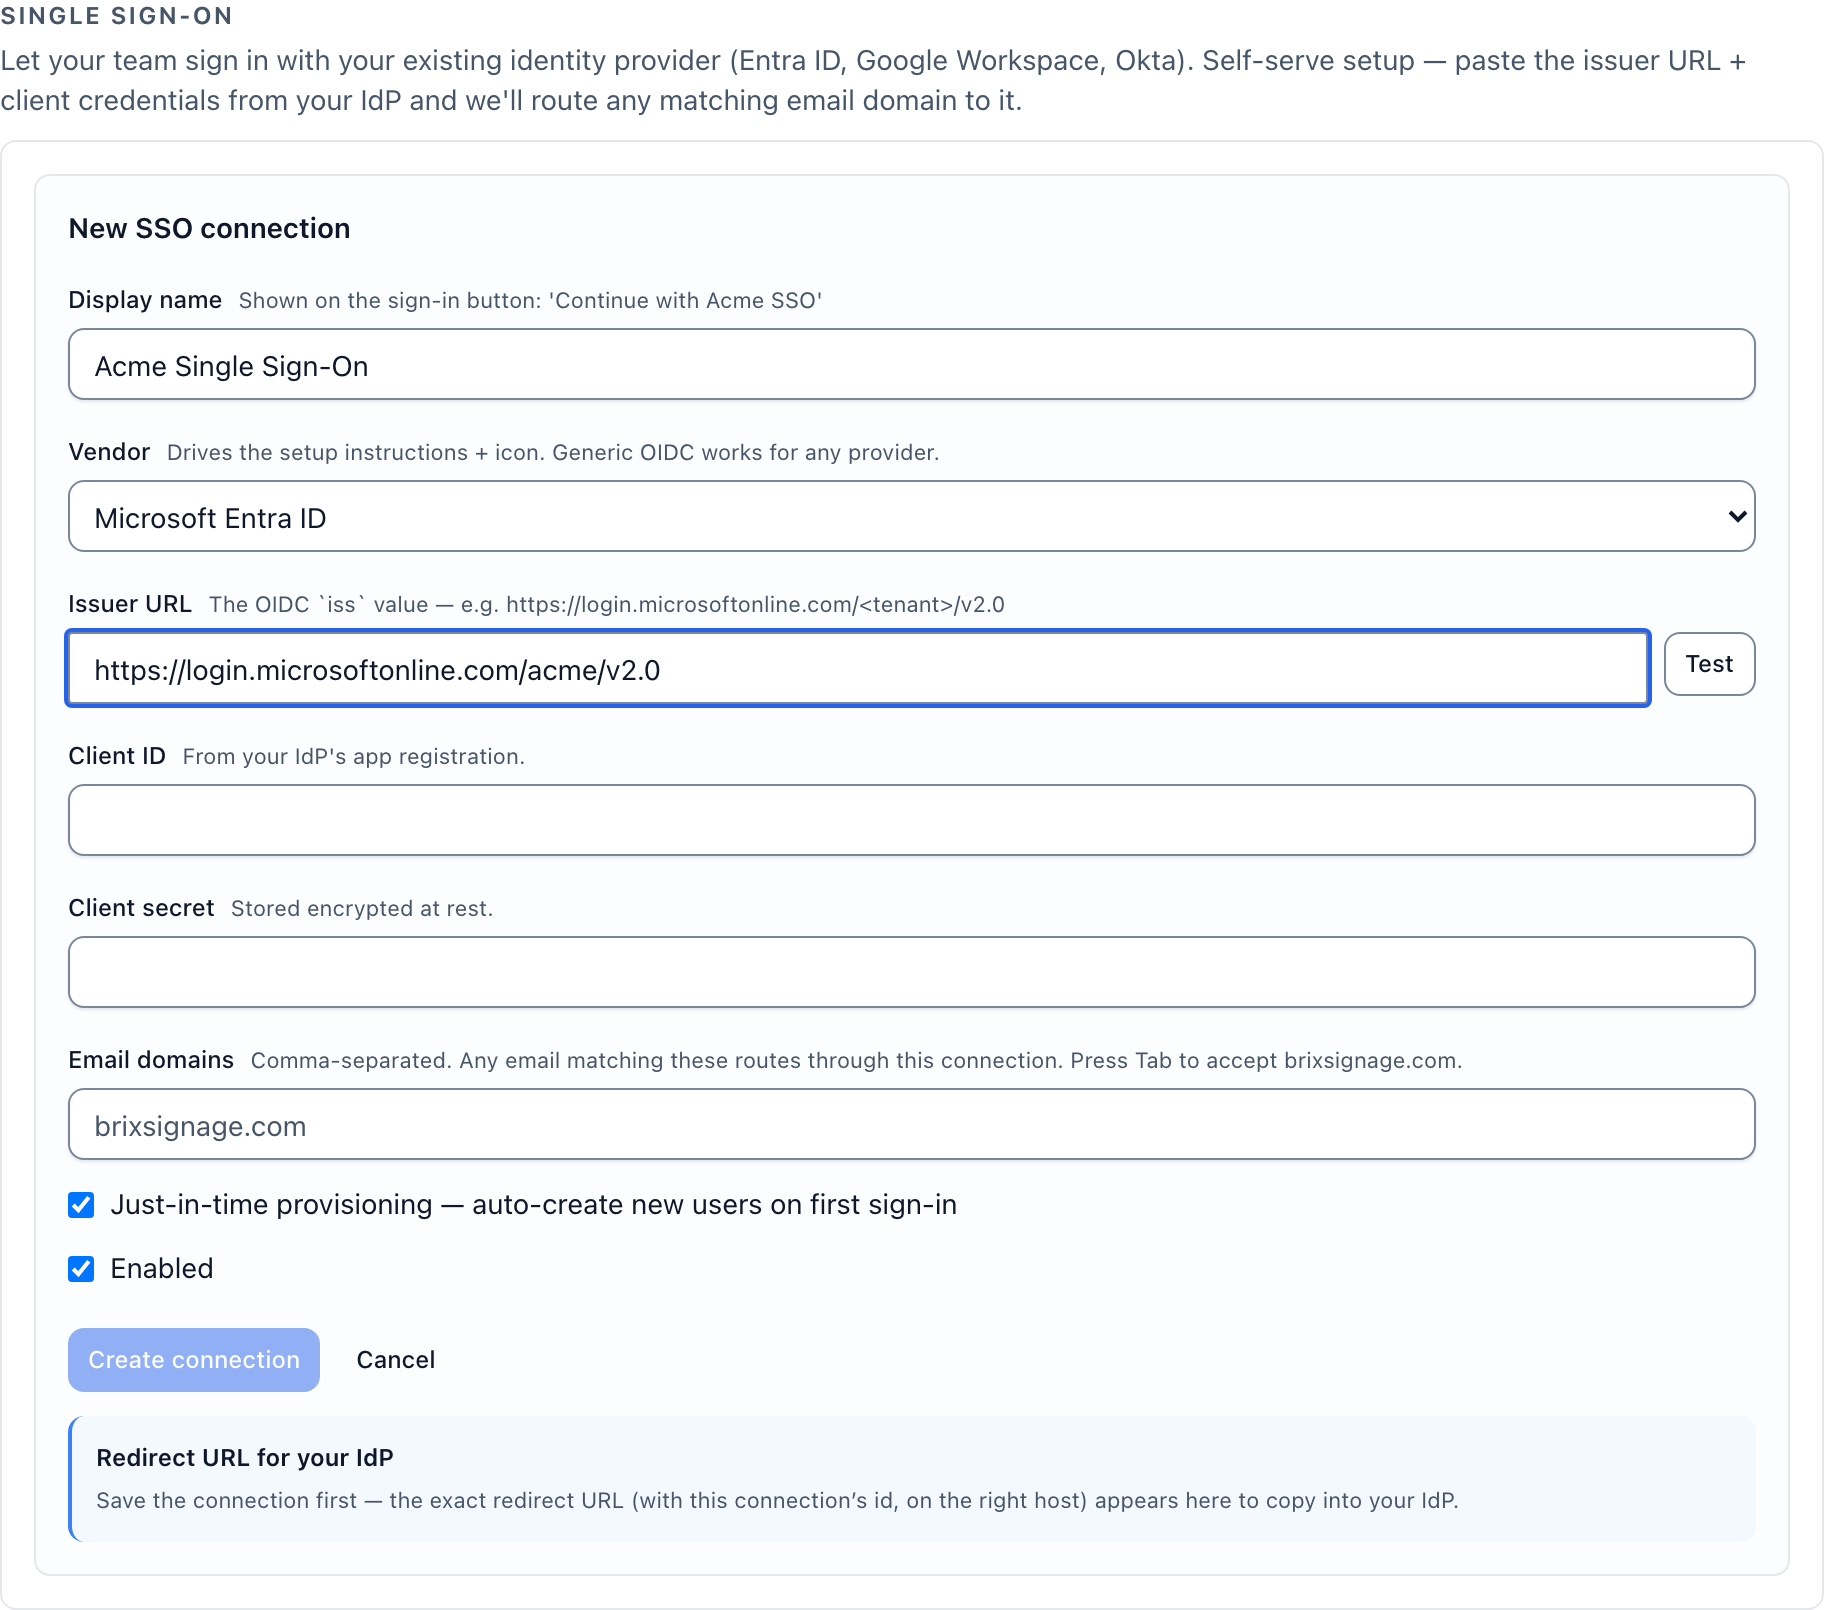
A connection reads Setup not finished until the details are saved, the domains are verified and one person has signed in through it. Select Finish setup on its row to see which step is left. To change a connection, select Edit. Leave Client secret empty to keep the stored one, or clear Enabled to stop it without removing it. Removing a connection (trash button, then Remove) stops everyone in its domains signing in that way, so give them a password or passkey first.
Give roles and locations from your identity provider
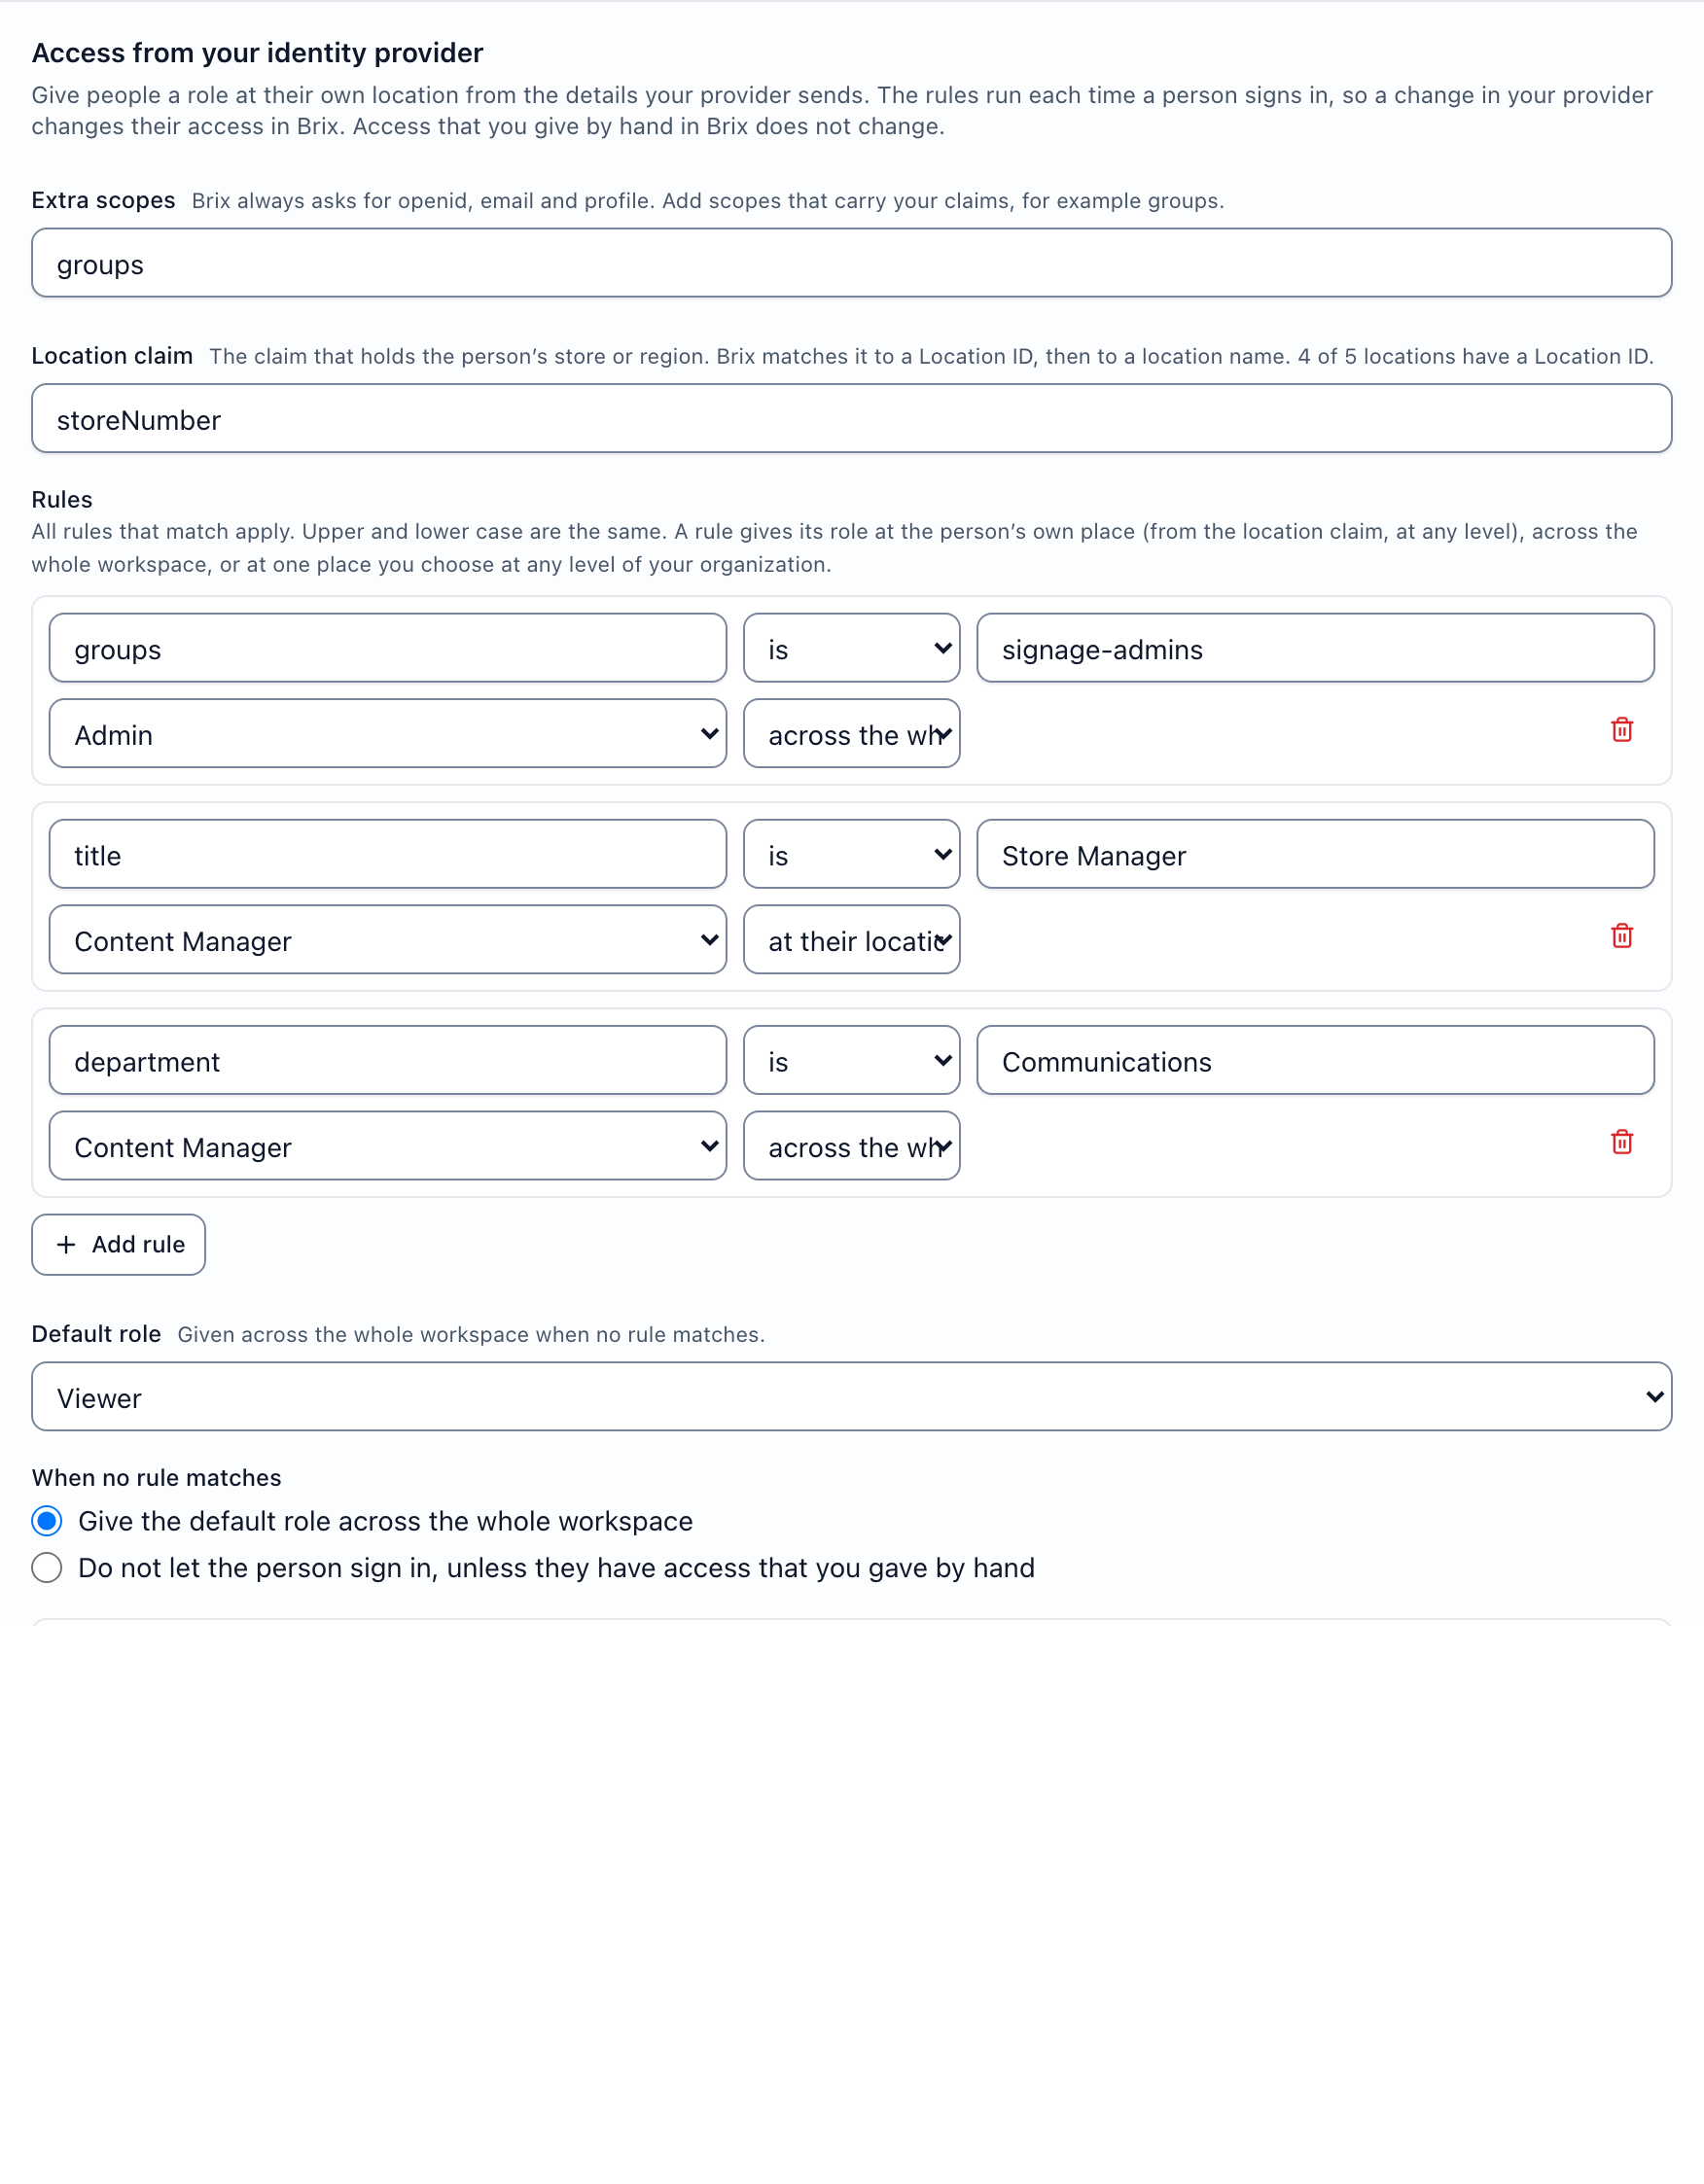
Access rules give each person a role at the right place from the claims your provider sends, such as groups, title or a store number. They run at every sign-in, so a new job title in your provider changes access in Brix. Access you give by hand in Brix does not change.
- On the connection's row, select Access rules.
- In Extra scopes, add any scope that carries your claims, for example
groups. Brix always asks for openid, email and profile. - In Location claim, type the claim that holds the person's store or region, for example
storeNumber. Brix matches it to a Location ID, then to a location name. - Select Add rule. Choose a claim, is or contains, a value, a role, and where: at their location, across the whole workspace or at one place you choose.
- Choose a Default role and what happens When no rule matches: give the default role, or do not let the person sign in.
- Under Check the rules, change the sample claims and select Check to see what a person would get. Then select Save access rules.
Sign leavers out at once (provisioning with SCIM)
Single sign-on checks a person only when they sign in, and a Brix session lasts up to 30 days. Provisioning lets your identity provider tell Brix about a change as it happens: a leaver is signed out at once, a new store changes access straight away, and new people appear with their role before they first sign in.
- Verify the connection's domains first. Provisioning is refused until then.
- On the connection's row, select Provisioning, then Make a token. Copy it now: you cannot see it again.
- In Okta or Microsoft Entra ID, set the SCIM base URL shown in the panel and paste the token. How to connect Okta in the panel lists the exact settings for Okta and Entra ID.
To stop a token, select the trash button on its row.
Require single sign-on
- Under Sign-in policy for everyone, turn on Require single sign-on.
A member whose email domain a connection covers can then sign in only through it, and their password stops working. A member on a domain no connection covers keeps their password. If the connection has no sign-in yet, the switch reads Waiting for a first sign-in: passwords still work, and the rule starts by itself after the first sign-in through the connection.
Use single sign-on only on your own account
- Add a passkey, or connect Google, Microsoft or your company provider.
- Find the Password row and select Use SSO only.
- Select Remove password in the Switch to SSO-only? dialog.
The button stays hidden while the password is your only way in. To get a password back, use Forgot password? on the sign-in page. To change your password while signed in, select Reset password on the Password row: Brix emails you a link that works for 7 days.
To limit what each person can do and where, read digital signage user roles and permissions. To sign in or reset a forgotten password, read sign in and reset your password. For a credential that belongs to an integration rather than a person, read API keys. To see who changed what, read proof of play and audit.