Digital signage user roles and permissions decide two things for each person: what they can do (view, create, edit, approve, publish) and where they can do it (which locations and screens). A good setup gives head office every screen, gives each store or site manager their own screens only, and makes new content wait for a sign-off before it reaches a public screen. Most teams need four or five roles: an owner or admin who manages people and billing, content managers who build playlists, approvers who sign content off, local managers who change their own site, and viewers who only look.
In Brix you set this up in three steps in Settings > Organization: draw your locations as a tree, build the roles you need, then invite each person to a location with one role. A role given at a parent location covers everything inside it. Brix hides a control from anyone whose role cannot use it, so if you cannot see a button below, ask an owner for the permission.
Draw your locations (Structure)
- Open Settings > Organization. The Structure tab shows the chart. Drag to move, use the plus and minus buttons to zoom, and Fit to see it all.
- Select Tiers and name your levels, for example District and School. Press Enter to save each name, and Add a tier for a deeper level. Tier names belong to the whole workspace.
- Select a parent unit, then Add unit and type the real name in the detail panel. Or select Add several at once, download the CSV template, fill in Name, Timezone and Town or city, and upload it or paste the rows. The preview names every line Brix skips before anything is created.
- Select Matrix for one table of every unit, and Chart to go back.
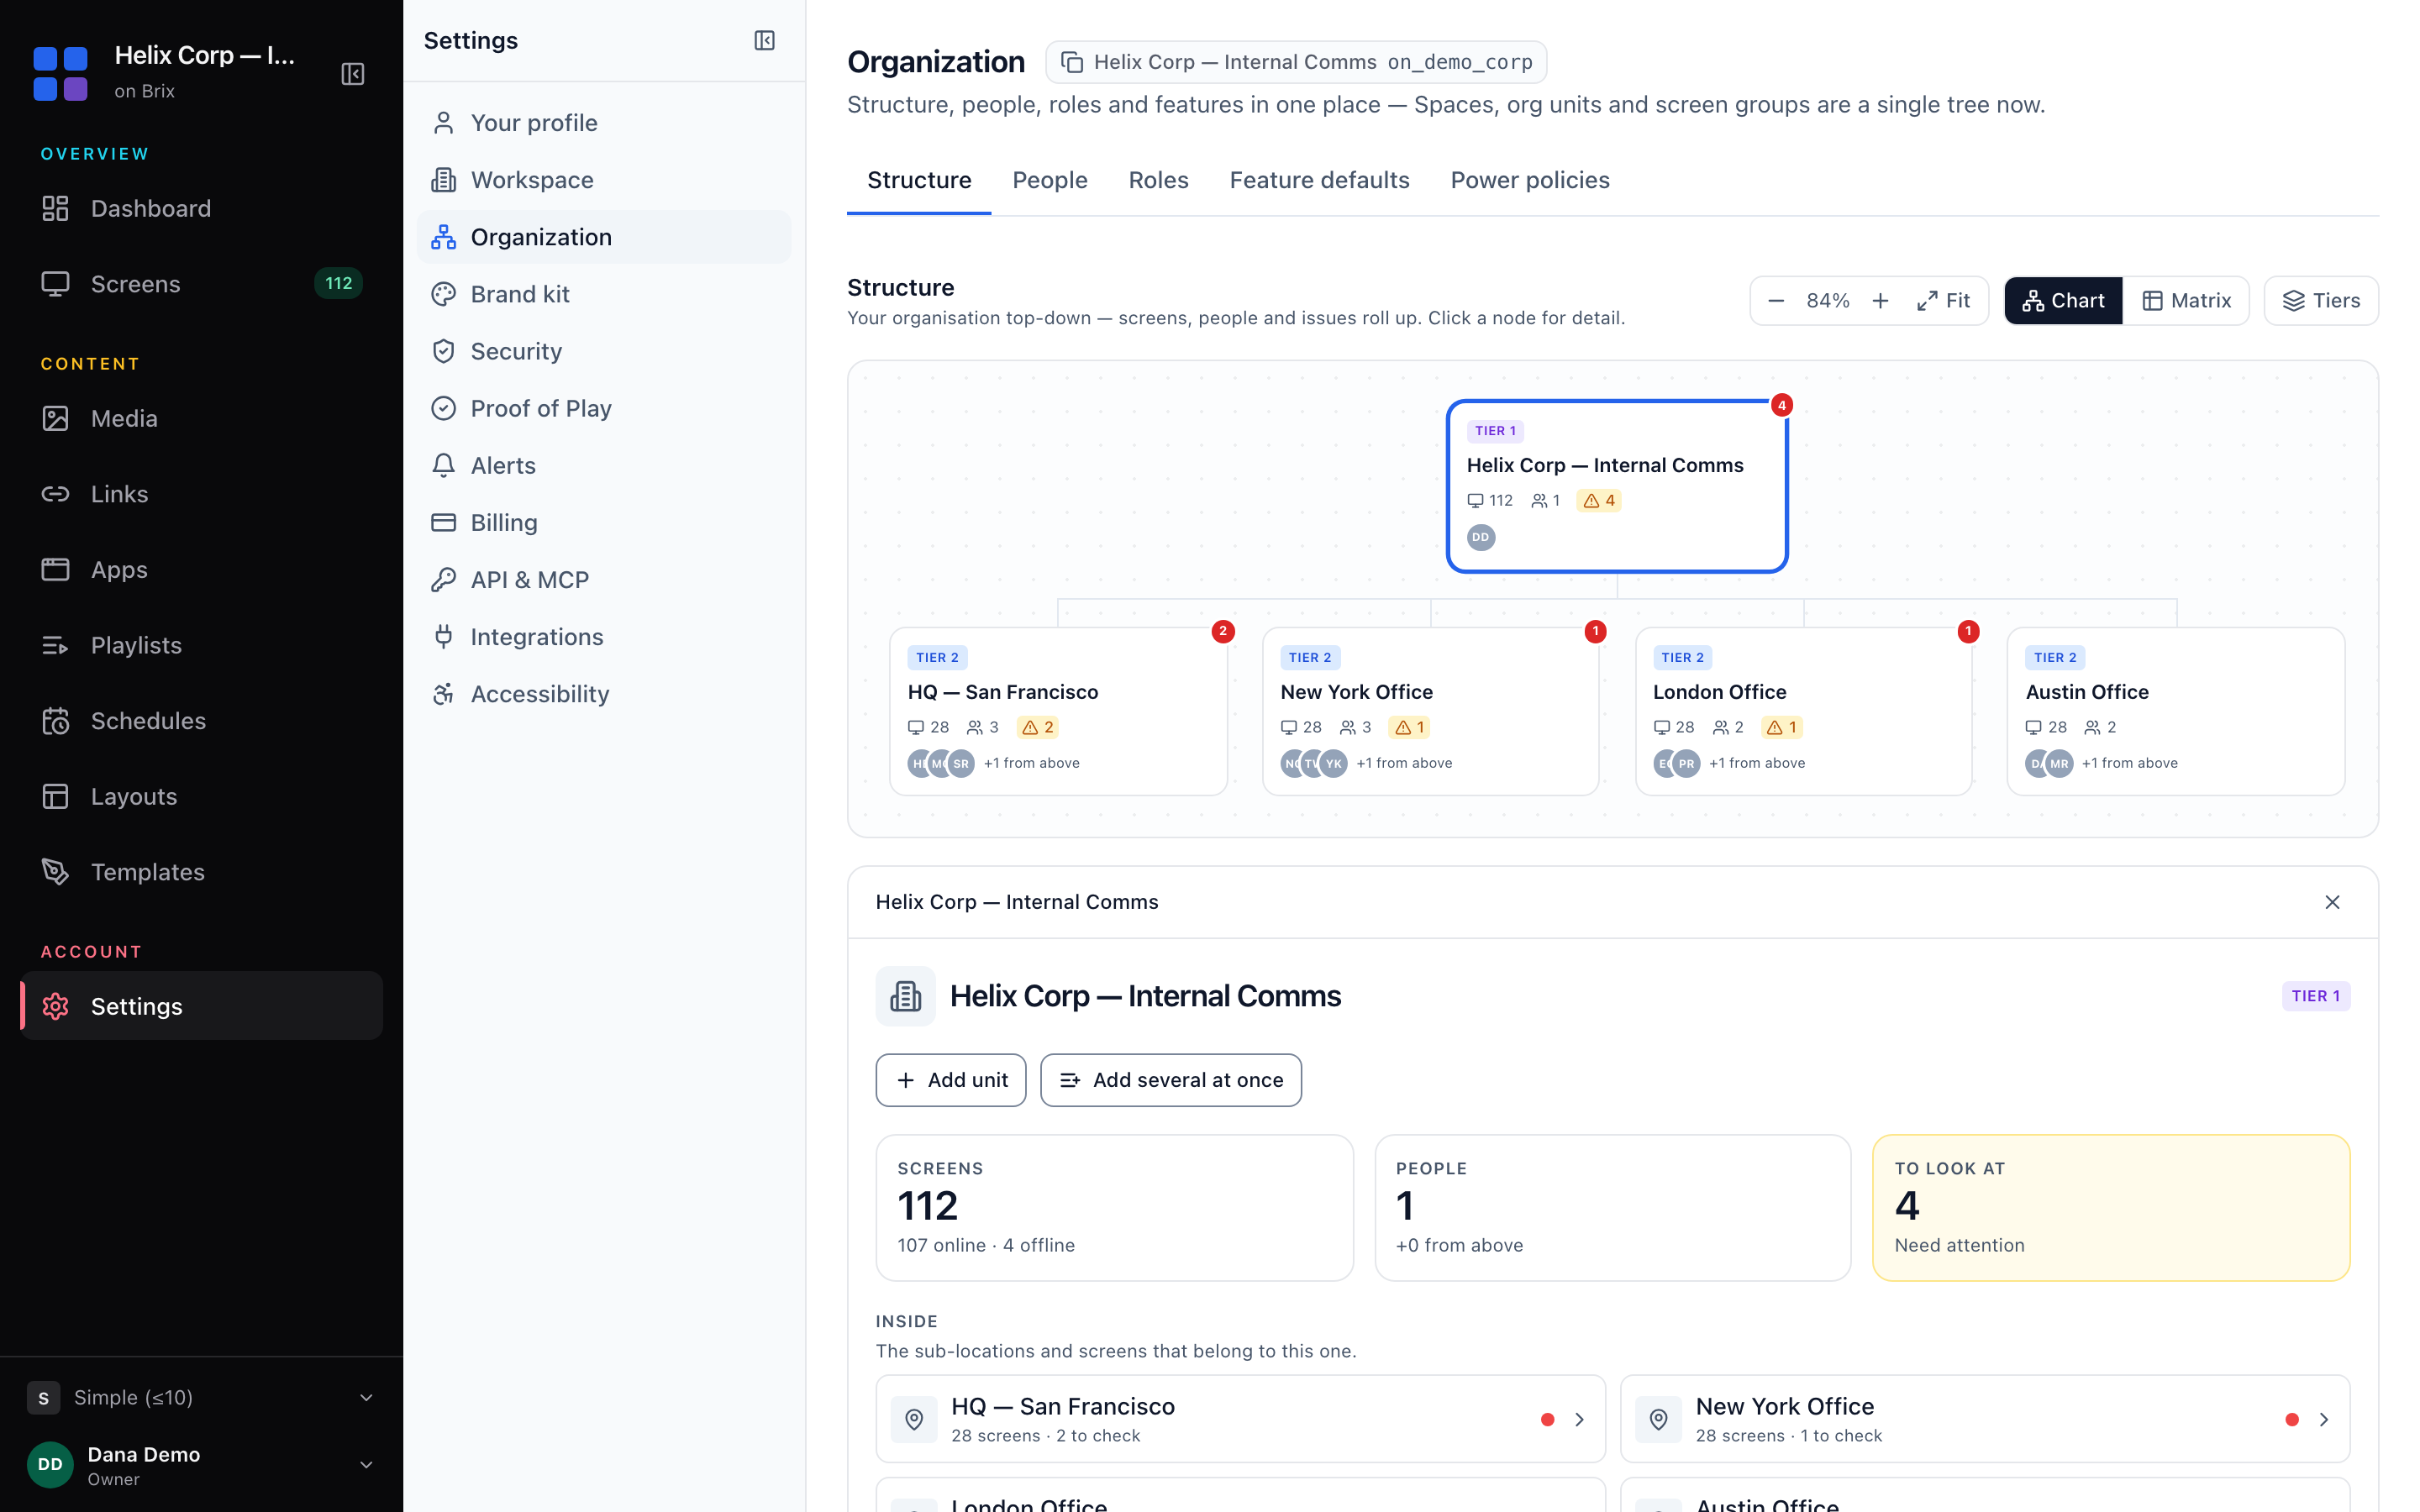
Select a unit to set its time zone, town and content in the panel below the chart. A screen or sub-location with its own answer keeps it. To ask for a sign-off at a location, read approve content before it airs.
Delete unit is not a plain delete. The unit's screens, content and folders move up to the parent first. Brix blocks the delete while the unit holds child units.
The people at the unit move up too and keep their role, which then covers everything in the parent. If a person already has that access at the parent, Brix does not add it again. You can delete a unit only if you can give each of those roles at the parent yourself. Only an owner can move an owner.
Build a custom role and choose its permissions
A new workspace has only the Owner role, so build the roles you need before you invite anyone.
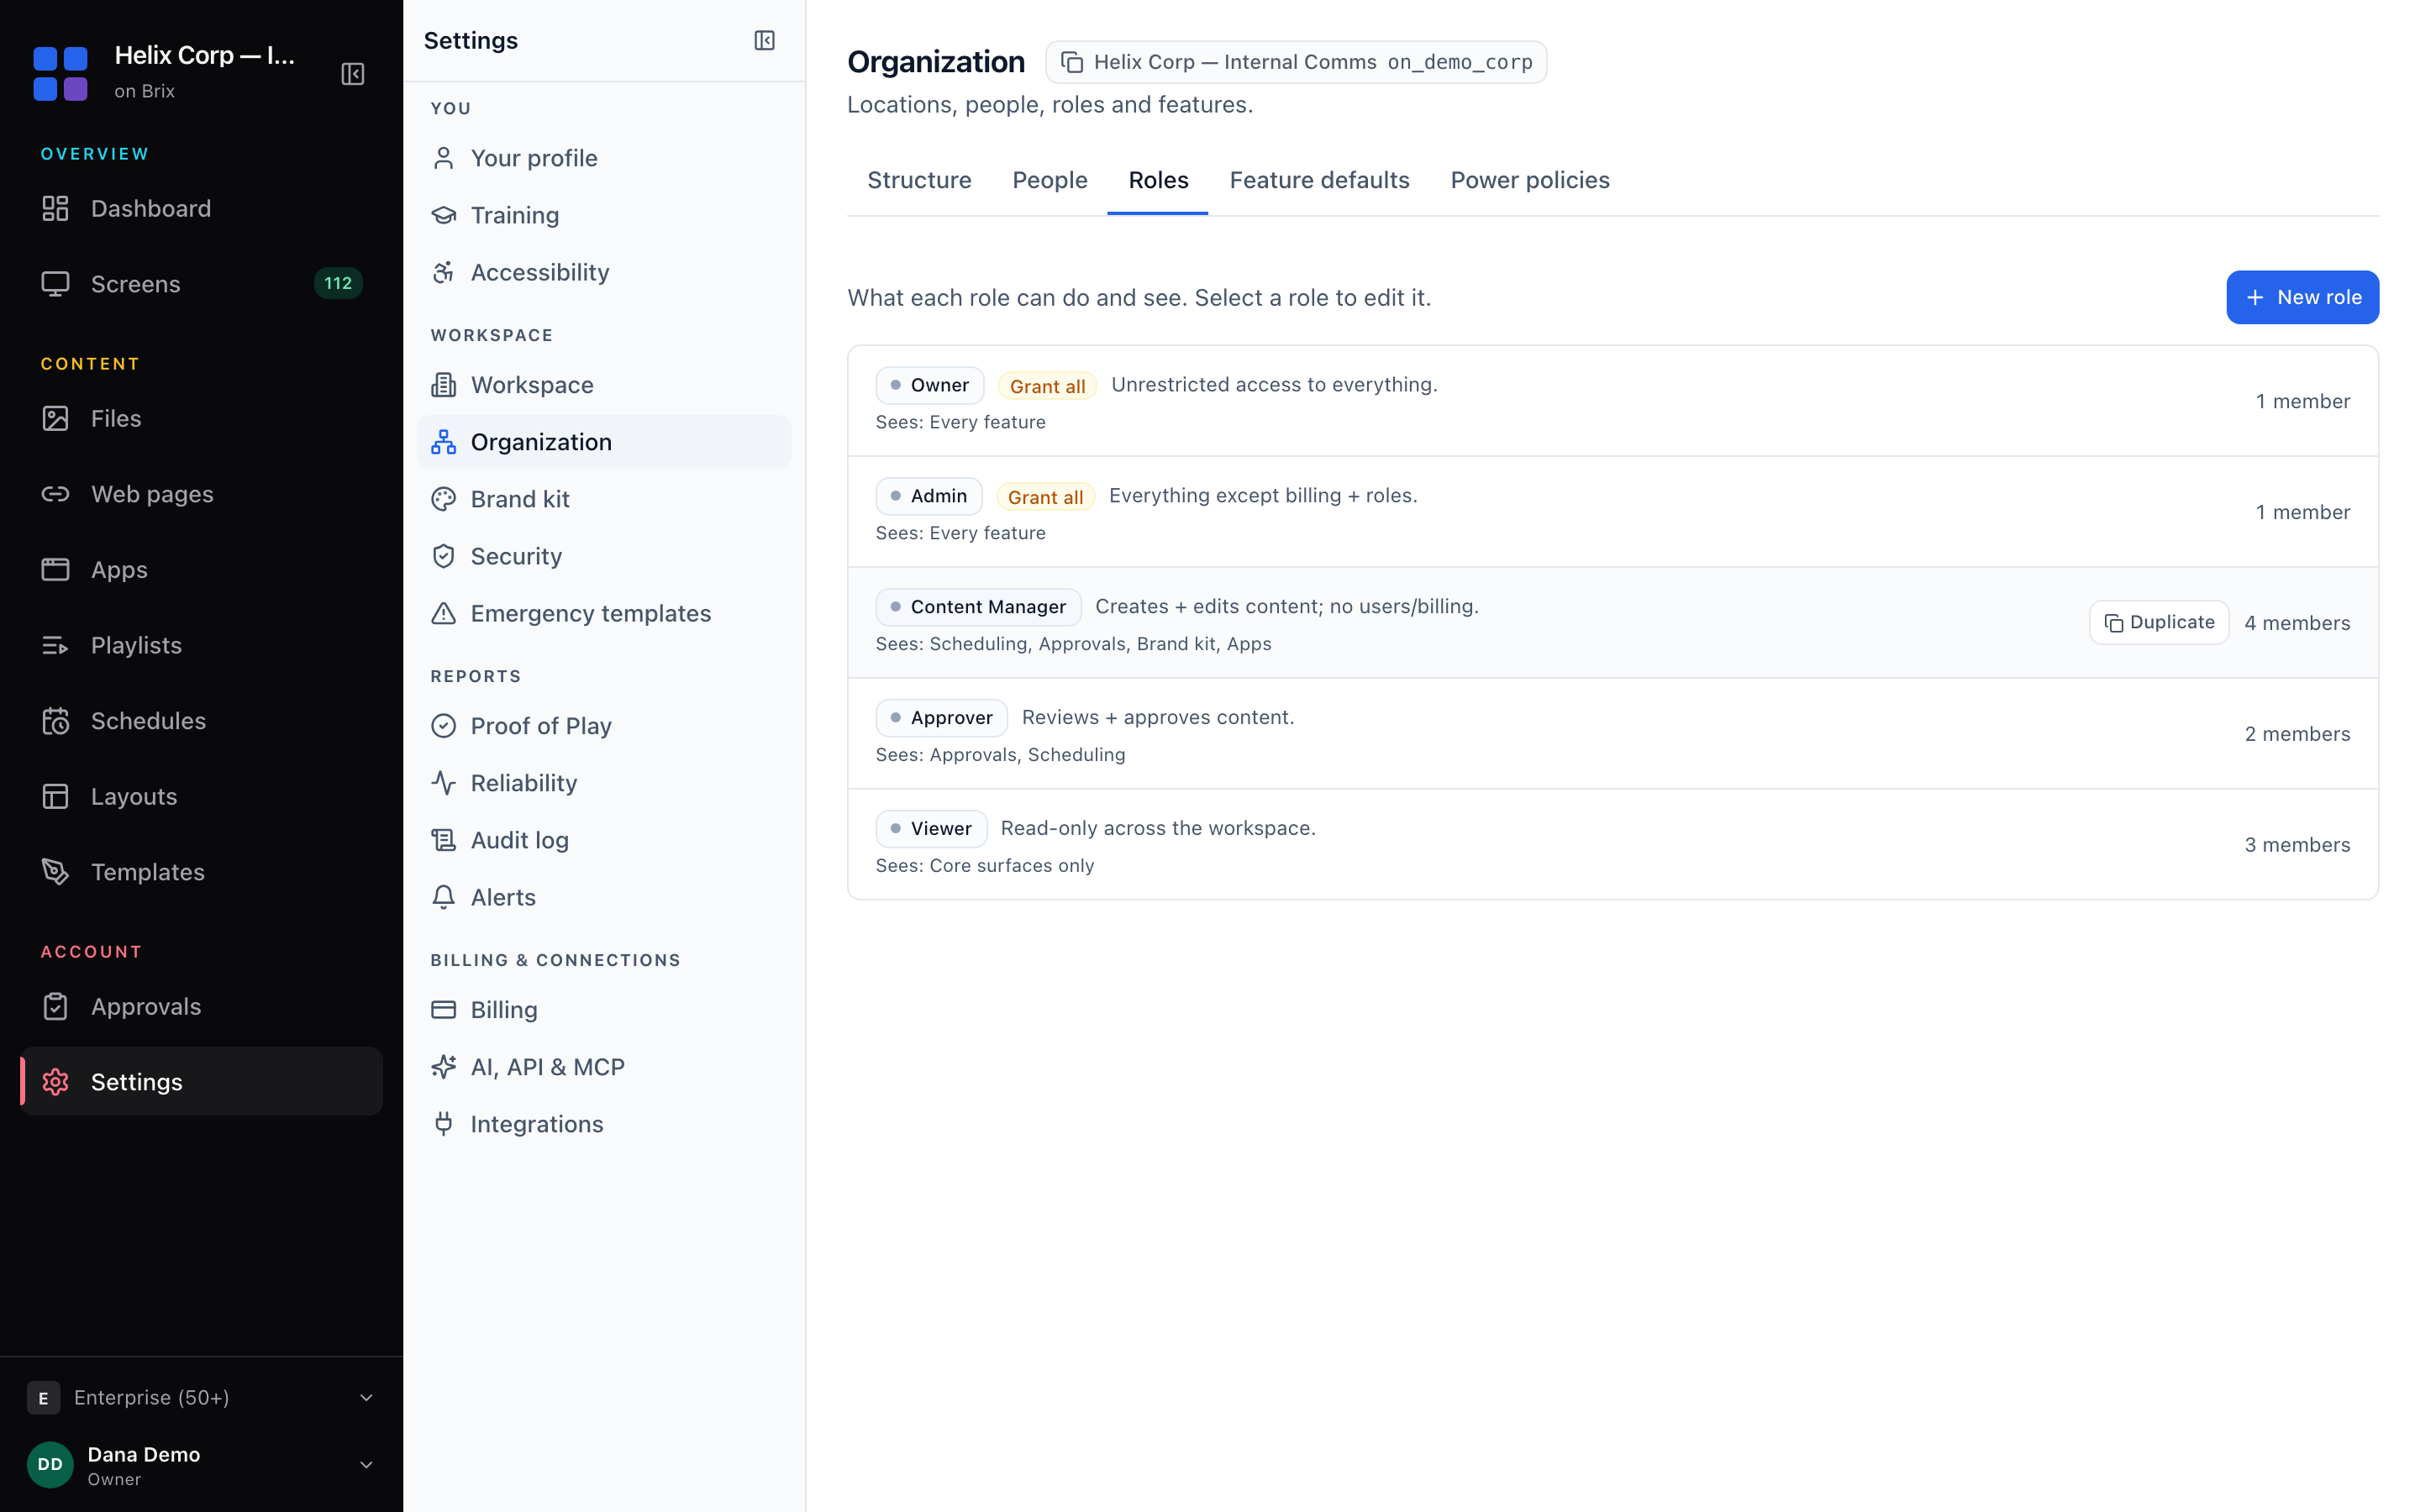
- Select Roles at the top of the page. Each card shows the description, member count and what the role sees.
- Select New role, or point at a card and select Duplicate. A built-in role never changes: use Save as new role.
- Type a name and description, and pick a color.
- Under Where this applies, choose Everywhere in this workspace or Choose specific places.
- Under Permissions, switch a whole resource on, or select single verbs such as View, Edit and Share to other locations.
- Select Create role. Delete role appears on a custom role you have already saved.
- Grant all permissions gives the same access as an owner.
- Sharing is its own verb: a role can hold Edit without Share to other locations. Read share a template.
- Nobody can hand out a permission they do not hold themselves.
- To choose which features a role sees, use Settings > Organization > Feature defaults.
Which permissions each role needs
Permissions are set per resource (Screens, Playlists, Schedules, Layouts, Creatives, Files, Apps, Billing, Users, Roles and more) and per verb. The verbs that shape a signage workflow:
| Verb | What it allows |
|---|---|
| View | See the item. Nothing else. |
| Create, Edit, Delete | Build and change the item. |
| Approve | Sign off content that another person sent for approval. |
| Share to other locations | Send the item to a location outside the person's own. |
| Cast to screen | Put content on a screen for a limited time, over its schedule. |
A starting set for a chain of stores:
- Admin: everything at the top of the tree, except billing and roles.
- Content Manager: create and edit content everywhere, no users or billing.
- Approver: view and approve content at their region.
- Local Manager: edit content and cast at their own store.
- Viewer: view only.
A sign-off is set per location, not per role: turn it on at a store or region and every change there waits for an approver. To set it up, read approve content before it airs. To give roles from your identity provider (for example, from a job title or store number) instead of by hand, read single sign-on for digital signage.
Invite users to a location with a role
- Select People at the top of the page, then Invite person.
- Type the email address (and optionally the full name), then select Continue to locations.
- Tick the locations the person may reach, then select Continue to role. A tick on a parent covers everything inside it, including areas you add later.
- Select one role card and read the summary sentence under the cards.
- Select Send invite.
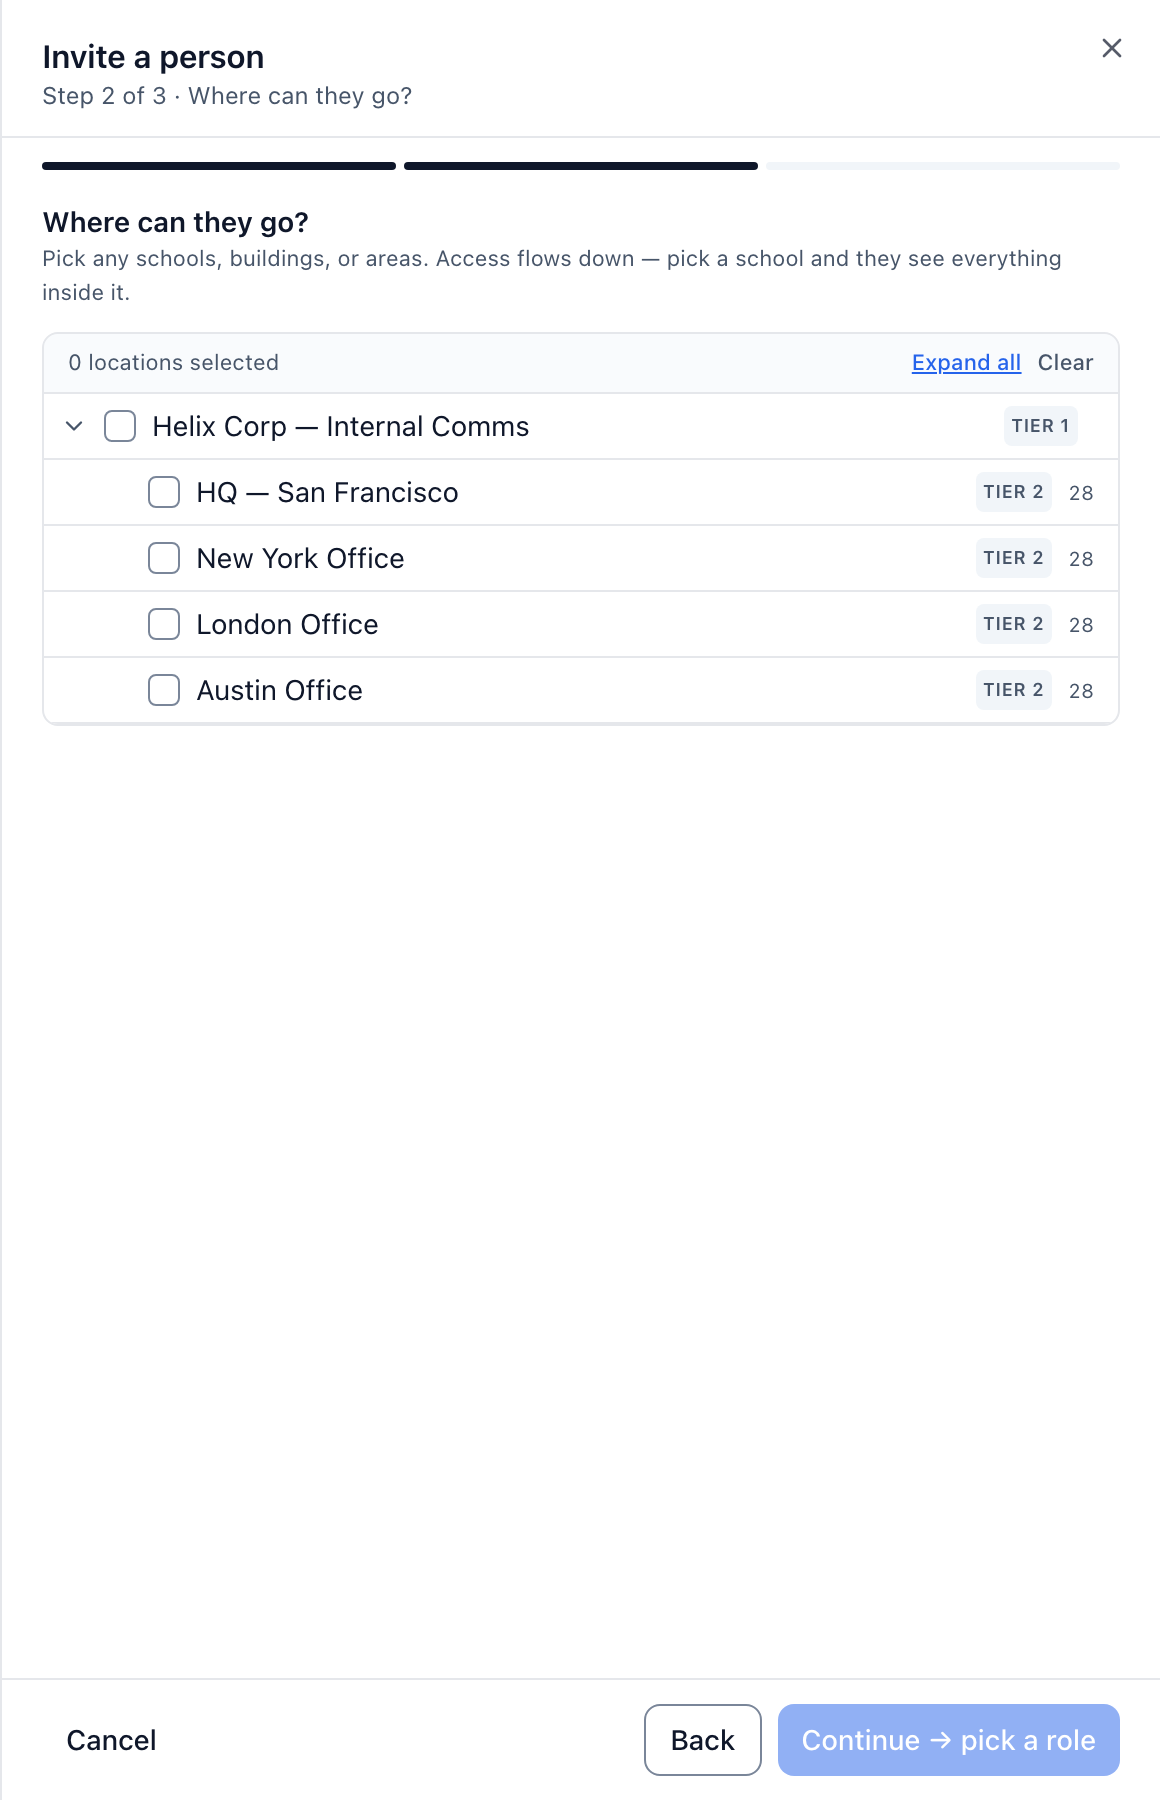
- One invite carries one role at every location you ticked. For a second role, invite the same email again.
- To add someone straight to one location, select its card on Structure and select Add person under People with access.
- If you have not confirmed your own email address, Brix creates the person but sends no set-password email.
- An email that already holds an account is linked instead, and the message reads added.
Check who has access, and remove a user who leaves
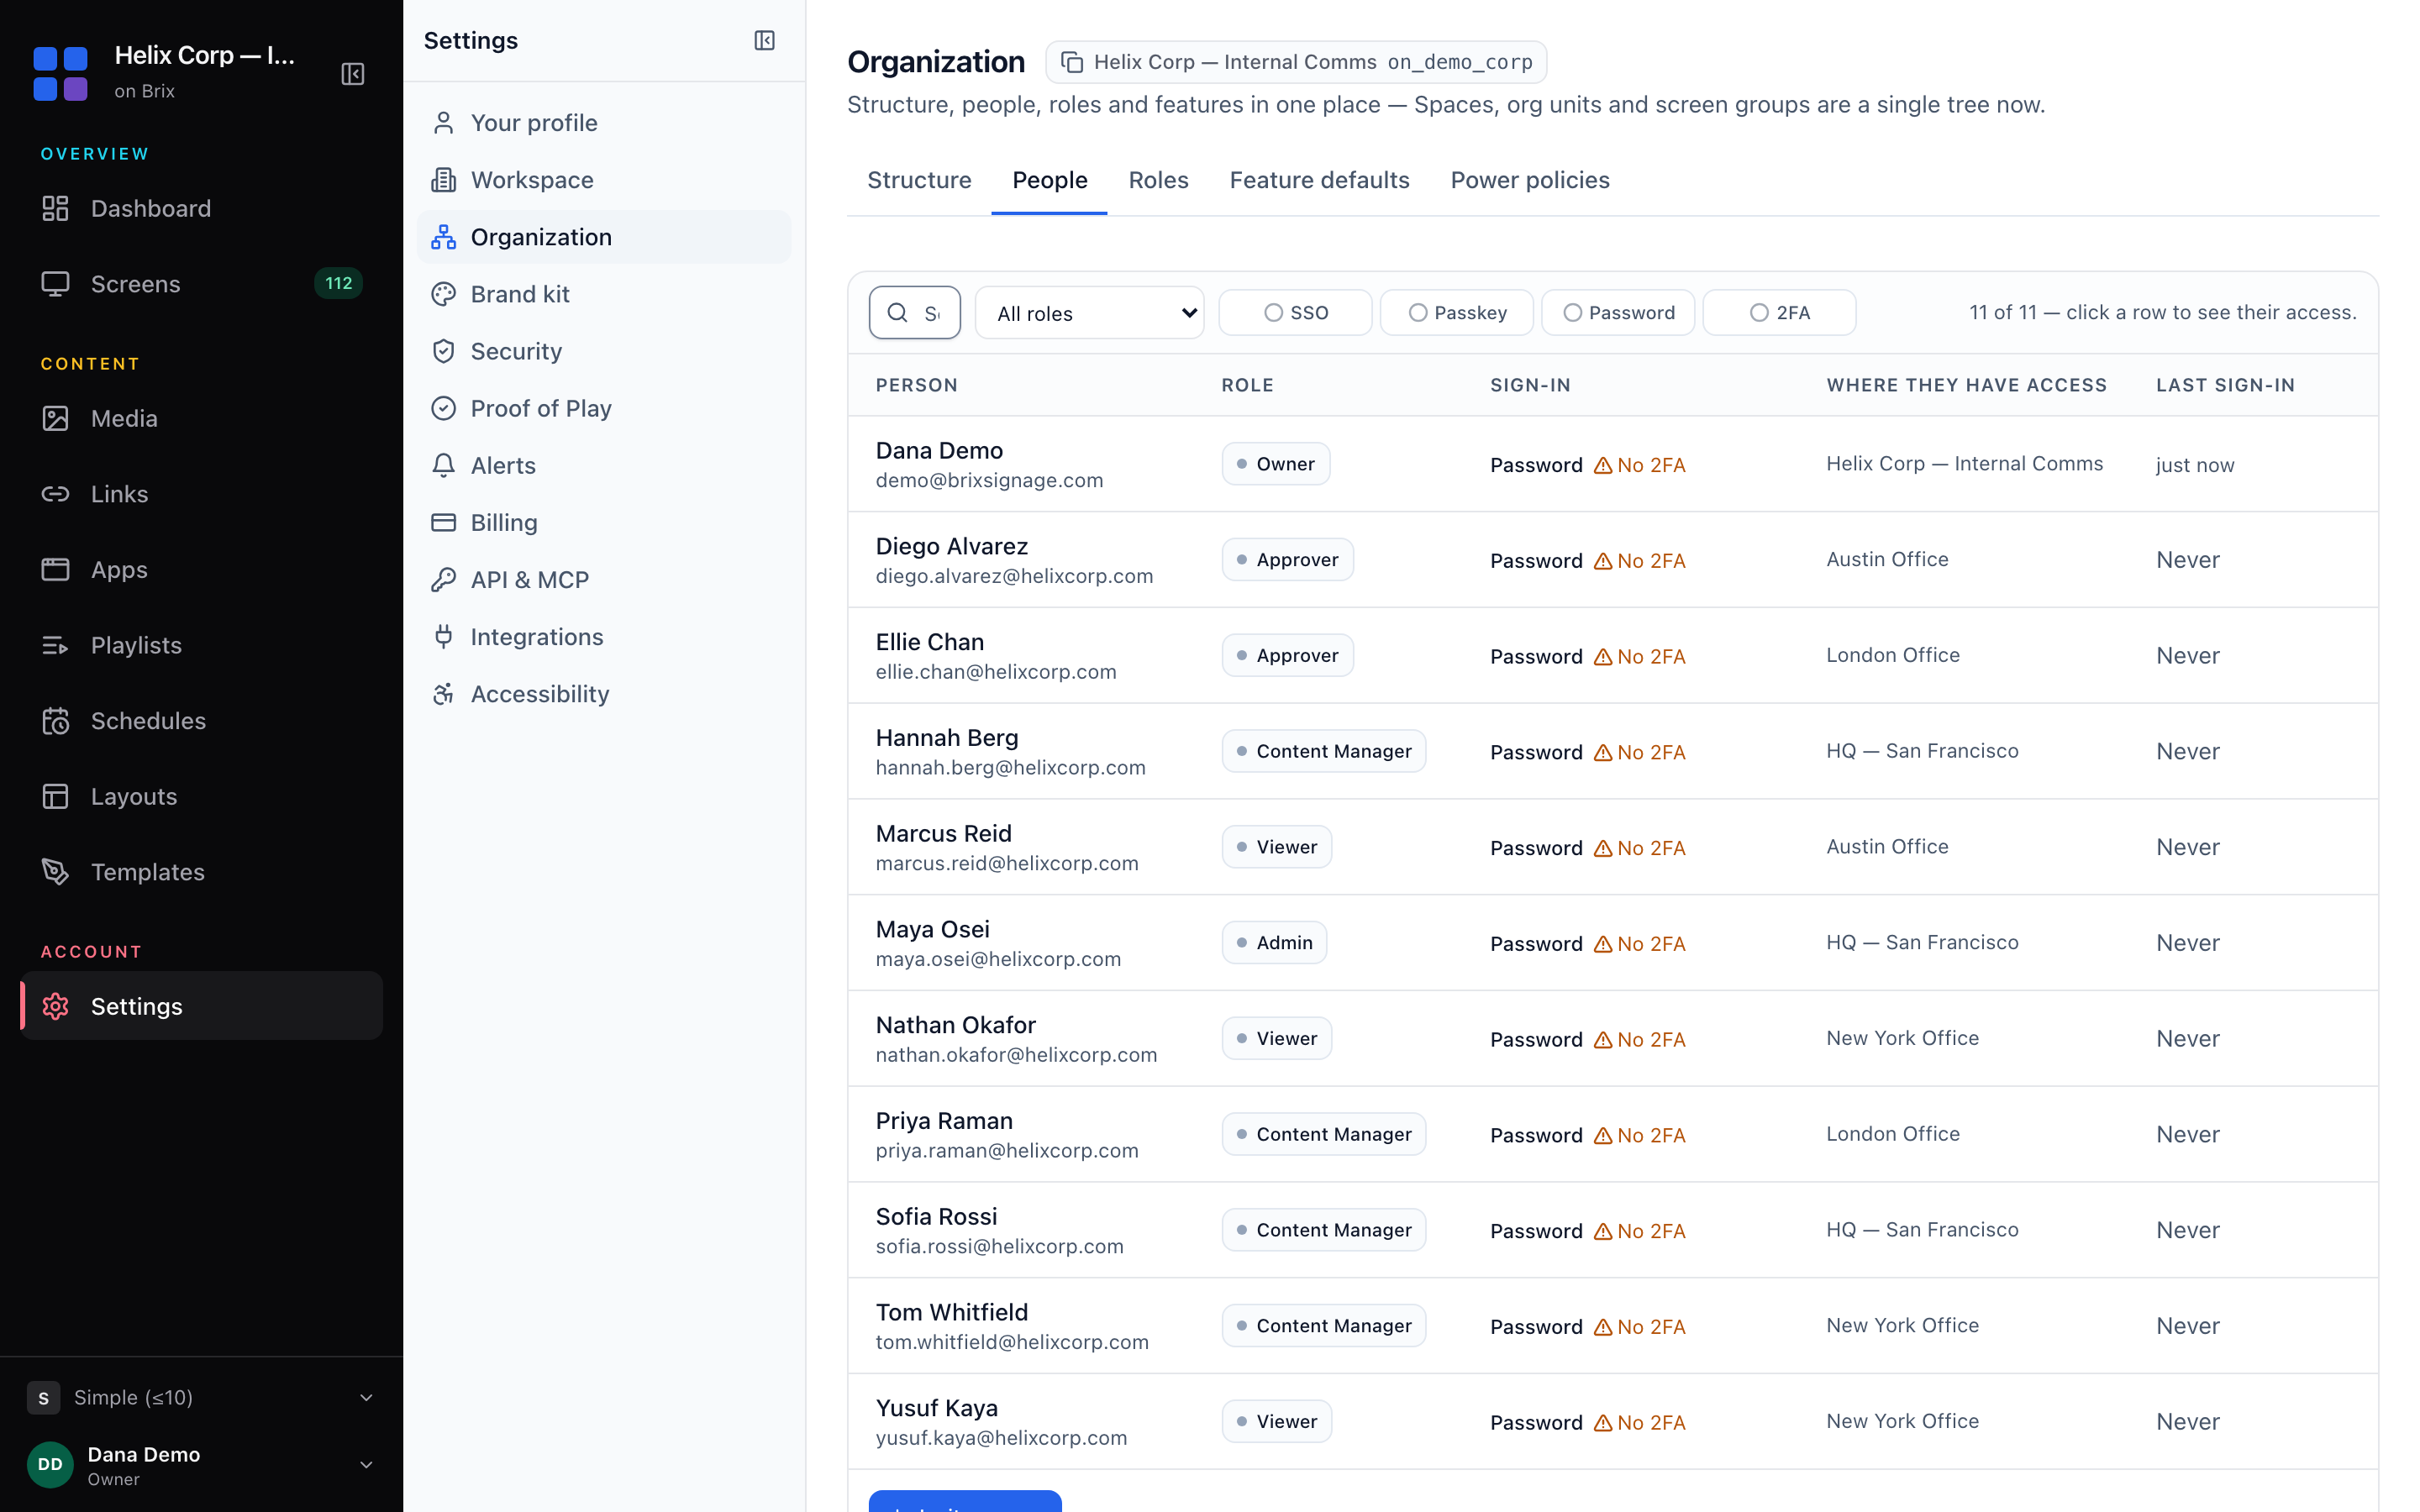
- On People, search by name or email, filter by role, or use the SSO, Passkey, Password and 2FA chips. Select a chip again to exclude that method.
- Select a person's row and read the Access list: one row per location with the role held there. A person with no location can sign in but sees no content.
- To remove someone who leaves, select Deactivate in the side panel. It signs them out everywhere, blocks the next sign-in and drops them as a named reviewer. Reactivate restores their access.
Last sign-in marks a person Dormant after 30 days. You cannot deactivate yourself. Only an owner can deactivate an owner, and nobody can deactivate a person who holds a permission they do not hold themselves: the button is disabled and says why.
If your team signs in through single sign-on, switching a person off in your identity provider stops their next sign-in, but a session already open lasts up to 30 days. Deactivate them here too, or turn on provisioning (SCIM) so leavers are signed out at once. Read security and single sign-on.
For a worked example of regions, stores and head office in one account, read digital signage user permissions by location. To hand content to another team, read share content between teams. To pair the screens at a location, read connect a screen.