Multi-location digital signage runs the screens in every store from one account. A rollout needs five things:
- A player on every screen.
- A location tree, so each screen belongs to a store.
- Roles and approvals, so a store changes only its own screens.
- One action that changes content in every store, and a share of airtime that each store fills.
- Remote reboot, screenshots and offline alerts, so nobody drives to a store to fix a screen.
This page shows how to run 30, 100 or 500 screens from one Brix account. For the project phases (prepare, test, pilot, rollout, handover), see our digital signage implementation plan.
Is there a volume discount for 100 screens or more?
No. Brix charges one price per screen at any count: $6 per screen per month billed annually, or $8 billed monthly.
- 30 screens: $180 a month billed annually ($2,160 a year).
- 100 screens: $600 a month billed annually ($7,200 a year), or $800 a month billed monthly.
- 500 screens: $3,000 a month billed annually ($36,000 a year).
Every feature on this page is in that price. You pay for the players one time.
Where do you get hardware for 30 or more screens?
The Amazon Signage Stick costs $99.99. Amazon charges $94.99 each for 10 or more, and $92.99 each for 50 or more.
- 30 Sticks: $2,849.70.
- 100 Sticks: $9,299.
The price rises to $174.99 on 7 January 2027, so a rollout that buys before then saves $75 a Stick. See the Amazon Signage Stick price increase.
Rolling out 30+ screens? Amazon gives you a free Signage Stick to test Brix. We arrange it: talk to us. It is one Stick, for the test. You buy every other Stick at Amazon's price. See how to get the free test Stick.
Setup takes about 10 minutes for each Stick:
- Plug the Stick into the TV. During the Stick's own setup, pick "Brix Signage".
- In the CMS, go to Screens and select Add screen.
- Enter the 6-digit code from the TV, and choose the screen's Location.
Across the Signage Sticks that run Brix, pairing takes a median of 2.6 minutes from the code on the TV to the screen in Brix. To pair many Sticks, see managing multiple Amazon Signage Sticks.
Brix also runs on Fire TV, Android boxes such as the Walmart onn, TVs with Google TV or Android TV built in, and Windows PCs. Use them where a store already has one. For a store you cannot visit, the Signage Stick is the better pick. Brix can reboot the Stick and turn the TV on and off through Amazon's own device management.
Brix does not run on Samsung Tizen, LG webOS or BrightSign players. For those screens, plug a Signage Stick into an HDMI port.
One login for all my locations: organize screens by store
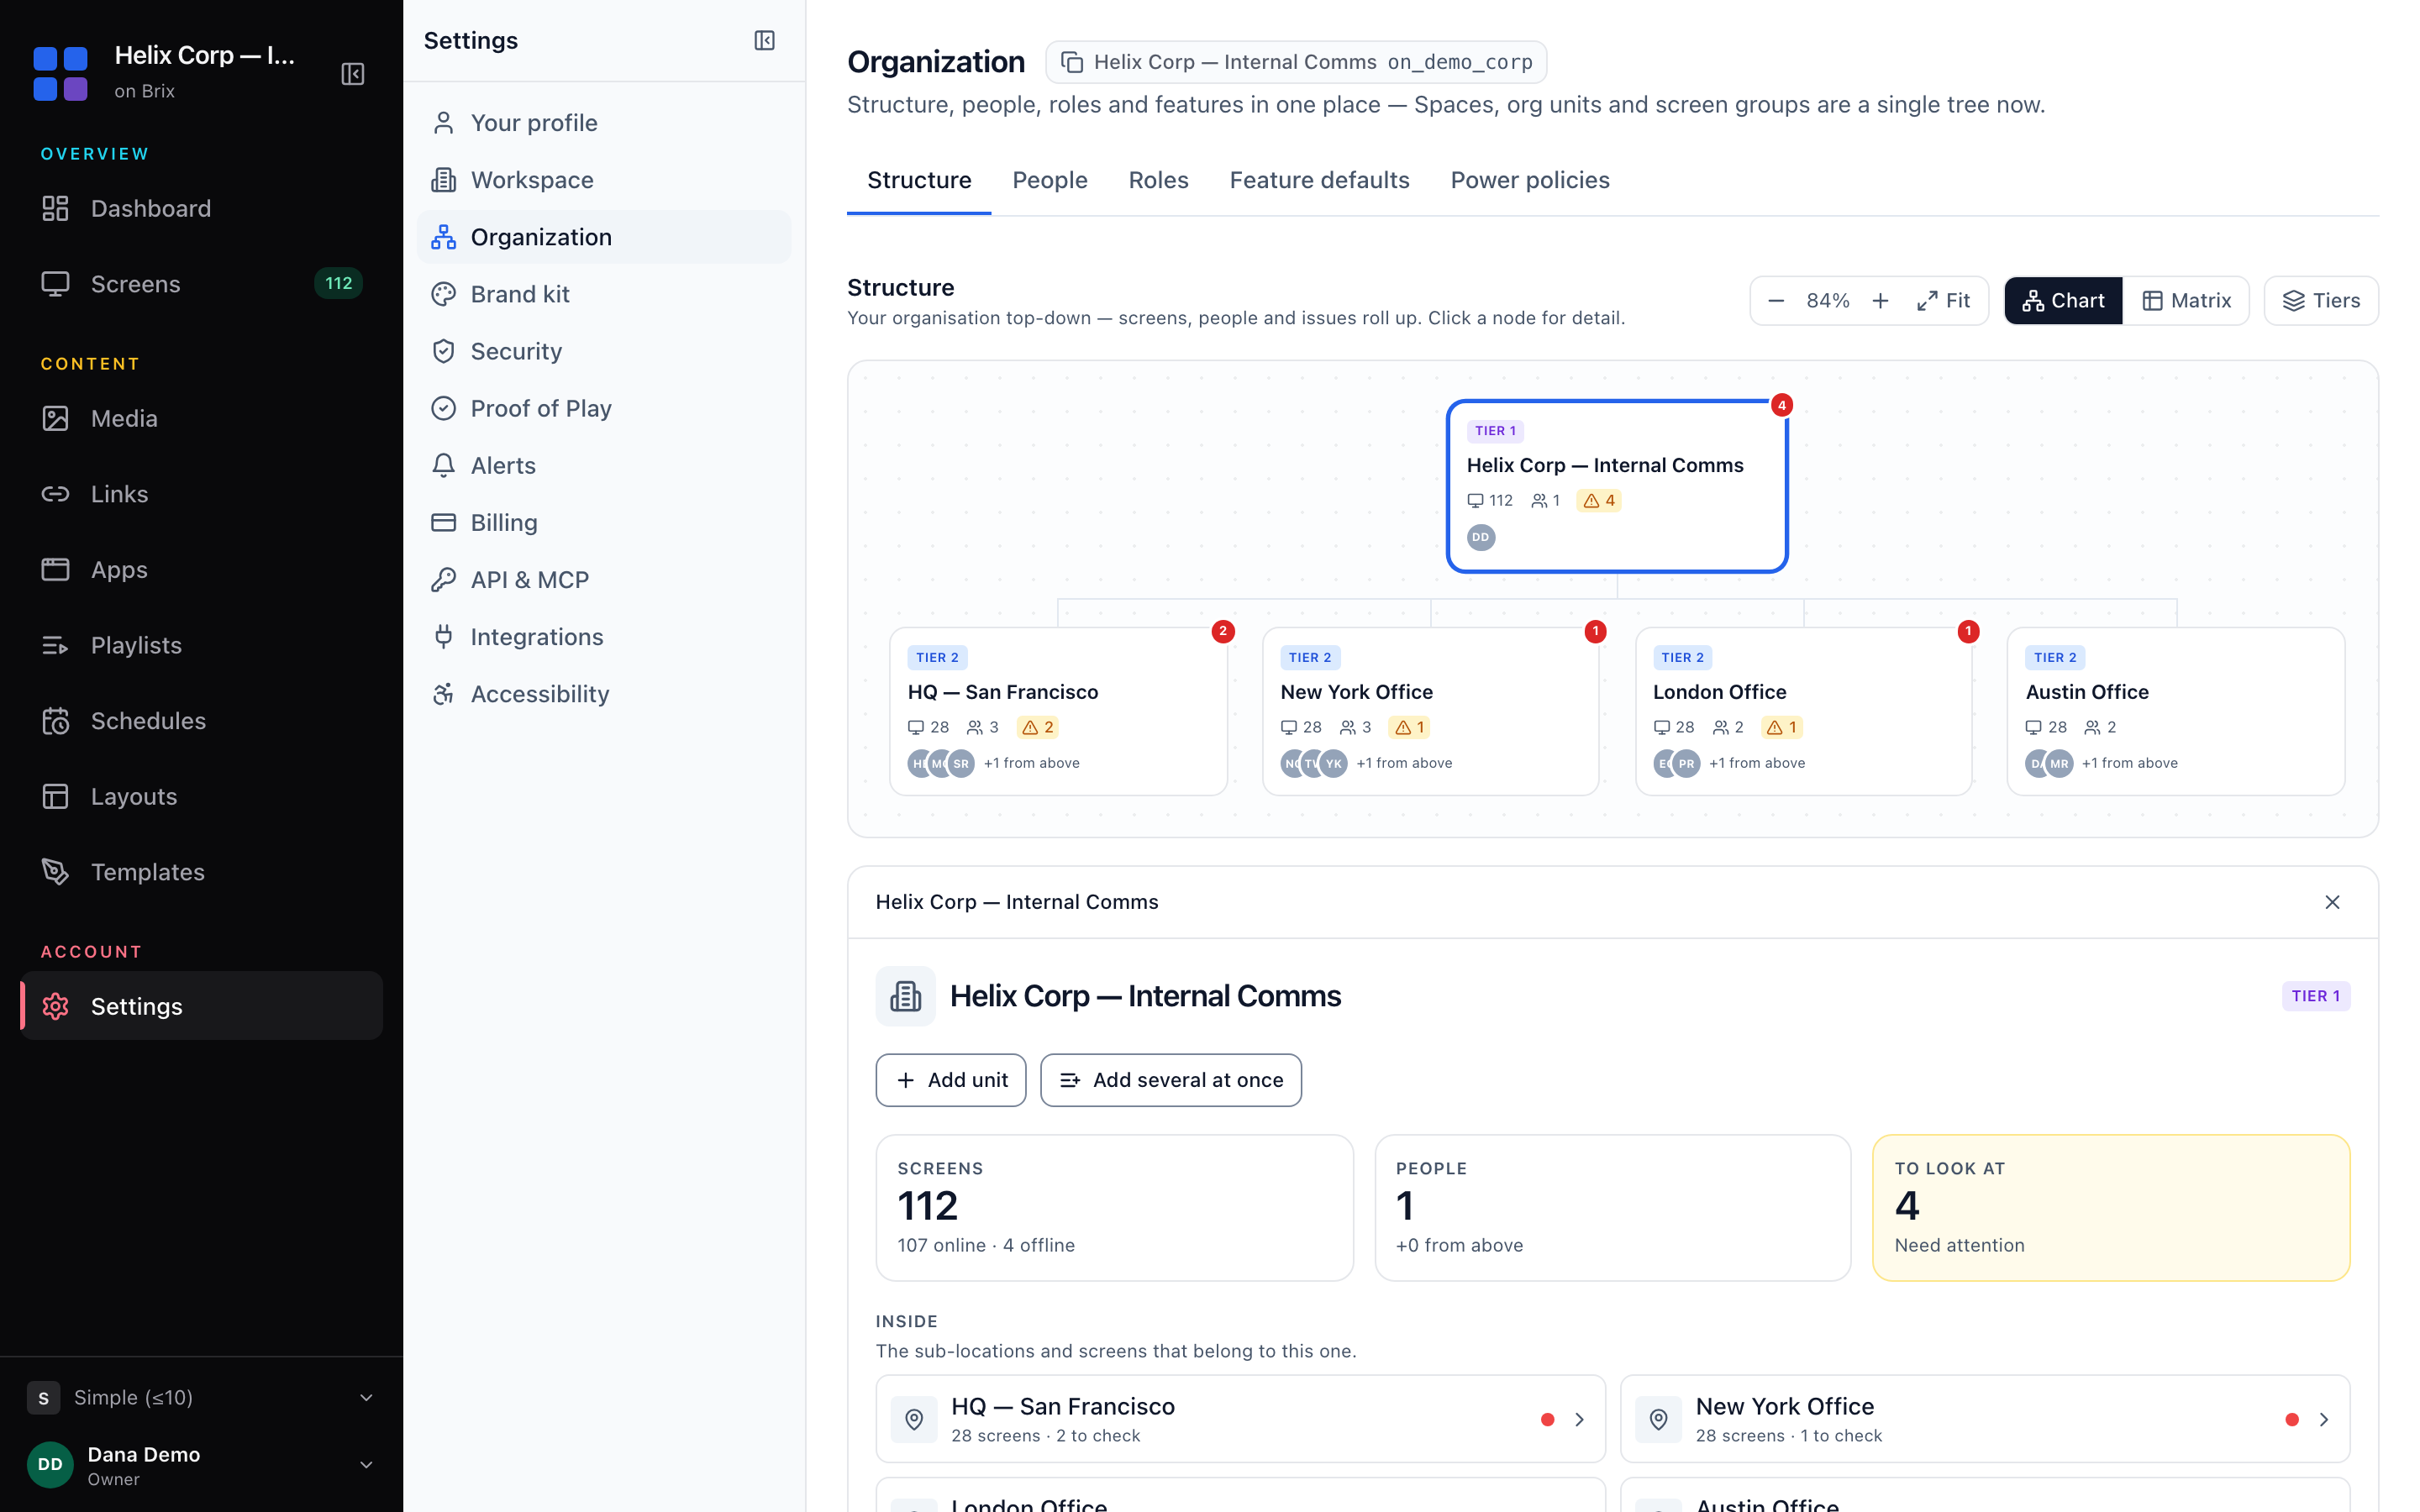
Go to Settings > Organization > Structure. Build the location tree one time:
- The company is at the top.
- Regions are below the company.
- Stores are below the regions.
- Areas inside a store are optional, for example a drive-through or a break room.
Each screen belongs to one location. Roles and approval rules that you set on a location apply to the screens in it.
Name each location as your company knows it: the store number, the city, or both. Name each screen by its position, for example "Counter TV" or "Cooler TV". Then "the cooler TV" means the same screen in every store.
One login covers every location in the tree. Nobody signs in to a separate account for each store.
Change every cooler TV in every store at once
Pick the way that fits how many screens you change:
- One store. The Screens list groups screens by location. Tick the box on a location's heading to select every screen in that location. Then select Change content in the bar.
- Every screen with the same name. Type the name in the search box, for example Cooler. Tick one screen. In the bar, select Select all, then Change content.
- The same screens every week. Make a screen group, so you do not select the screens again each time.
To make a screen group:
- Go to Screens and select the Groups tab.
- Select New group, then By name.
- In Screen name contains, type the part of the name that the screens share, for example Cooler.
- Turn on Add new screens that match. The cooler TV in a store that you open later then joins the group by itself.
- Open the group and select Change content. Every screen in the group changes in one step.

Let stores put up their own photos: a share of the airtime
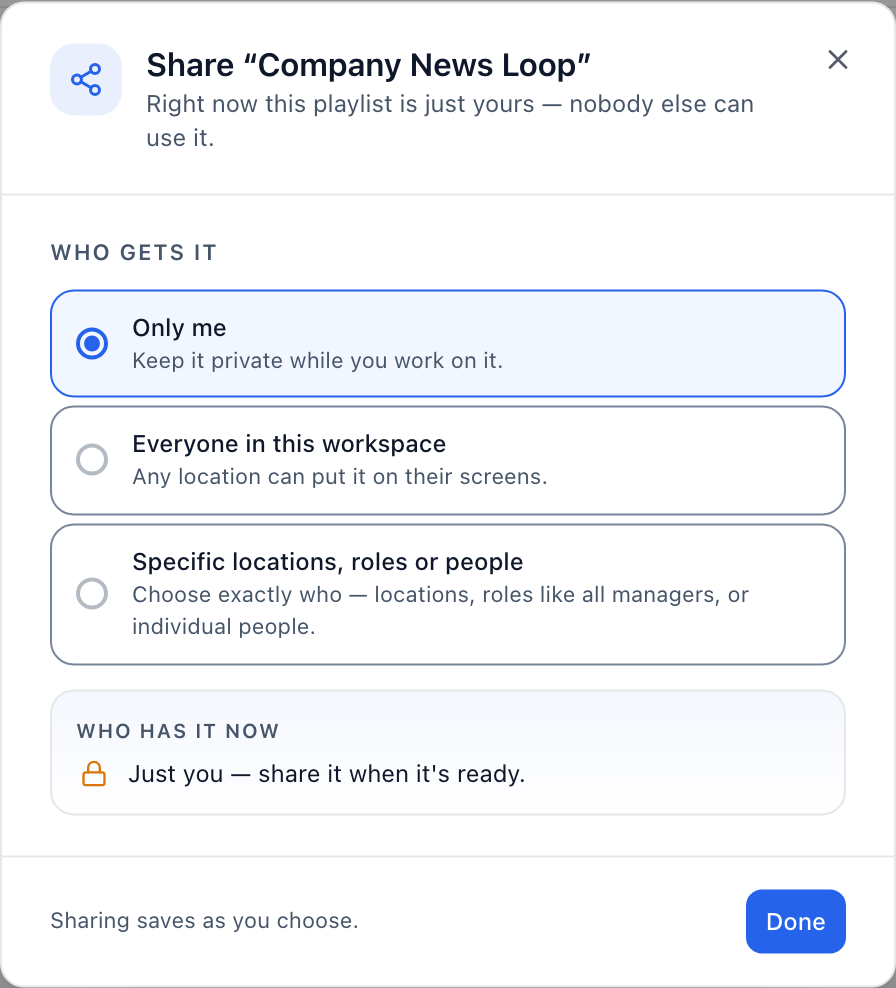
Buyers call this localised control: head office keeps most of the airtime, and each store fills a share with its own content. In Brix, the share is a setting on the playlist:
- Open the playlist and select Who can use it.
- Set the menu beside Add locations, roles or people to Can add content.
- Add the stores. A region adds each store inside it.
- Under Their own content, set the percent in Each location gets. A new share starts at 25 percent.
- To review a store's content first, turn on Check their content before it airs.
On a store's screens, the store's content plays for its share of the time, spread evenly through yours. Your content fills the rest. A share that a store leaves empty plays your content.
The store's team opens Playlists, finds the share under Shared with you, and selects Add your content.
A workspace set up for more than 10 screens shows this setting. In a smaller workspace, turn on Shared airtime at Settings > Organization > Feature defaults.
More detail is in corporate and local content on the same screen.
The store manager should only see his store (roles by location)
A role is a list of actions, for example view screens, upload files and approve content. Settings > Organization > Roles shows what each role can do. Select New role to make your own.
To give a manager one store:
- Go to Settings > Organization > People and select Invite person.
- Enter the person's email.
- At Where can they go?, choose Only some locations and tick the store.
- Choose the role, then select Send invite.
The manager sees and changes only that store. Access flows down the tree: a person invited to a region gets every store in it, and each store that you add to it later.
Give head office its own location in the tree, next to the regions. The content team's role can then hold every content permission and still stop at the edge of head office.
Our permissions by location guide has a worked example for a chain with 40 stores.
Nothing goes on a screen until someone signs it off (approval by location)
Turn approval on for each location that needs it, not for the whole account:
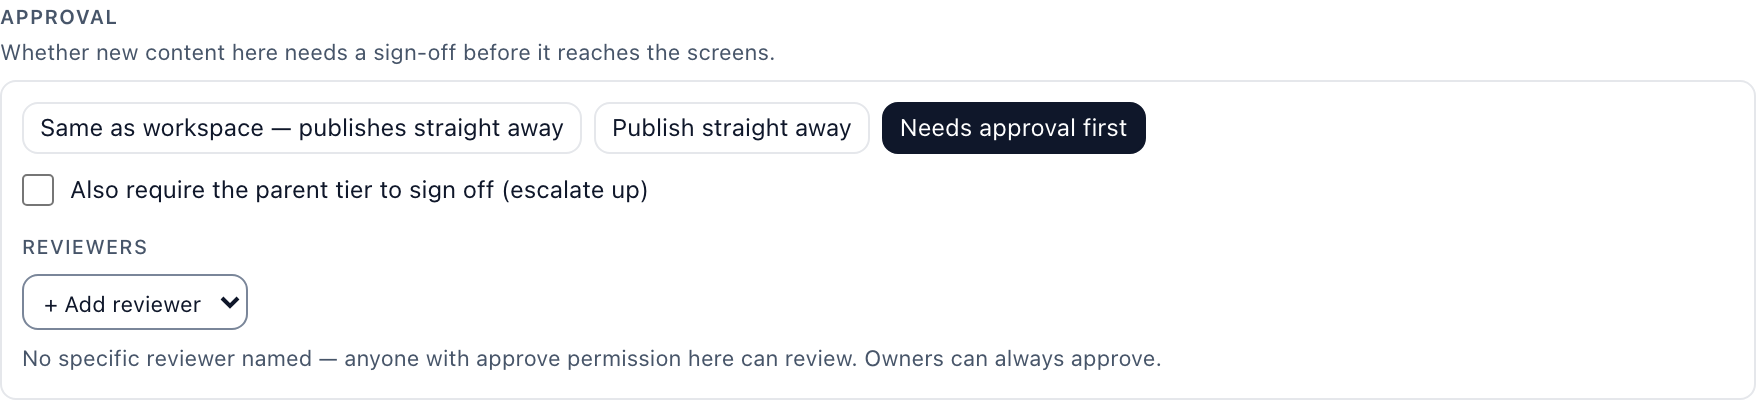
- Go to Settings > Organization > Structure and select the location.
- In Approval, select Needs approval first.
- Under Reviewers, add the people who sign off. If you name nobody, anyone with approve permission at that location can review.
A store that uploads its own photos then waits for a tick before anything reaches the screen. Set head office to Publish straight away and its content skips the step.
For a second sign-off, tick Also require the parent tier to sign off (escalate up). After the store's reviewers approve, the request goes to the level above. The box is off until you tick it.
See approve content before it airs for the full chain.
Reboot it from the Amazon level: remote control of every screen
- Reboot. Select the screens, then select Reboot in the bar. Reboot works on the Amazon Signage Stick, through Amazon's own device management, and on the Windows player. A Fire TV from a shop has no Reboot. Most Android boxes and Google TV sets refuse the command, and the screen's panel shows Screen refused.
- Screenshot. Take screenshot asks the player for a picture of what it shows. Head office can check a store's TV without a call to the manager. A screen in a browser tab has no screenshots.
- Offline screens. If a screen is offline, a command shows Queued · runs on reconnect. The command runs when the screen is back.
- Offline alerts. Open Alerts, select Alert rules, then New rule. Pick Screen goes offline, apply the rule to a location, and choose email, a webhook or Microsoft Teams. See digital signage screen offline alerts.
Rollout checklist
| Stage | What you do | Where in Brix |
|---|---|---|
| Pilot | Run a few real stores before you order for the rest. See the pilot guide. | The same account, with the pilot stores in the tree |
| Hardware | Test with one Stick. Then order the Sticks, or list the TVs and boxes that you keep. | Amazon, at $99.99, $94.99 (10 or more) or $92.99 (50 or more) each |
| Locations | Build the tree: regions, then stores, then areas | Settings > Organization > Structure |
| People | Invite each manager to their own store | Settings > Organization > People |
| Approval | Turn on approval for the stores that upload their own content | The location's Approval setting |
| Content | Change a group of screens in one step. Give each store a share of a playlist. | Screens > Groups, and Who can use it on the playlist |
| Go-live | Pair each screen at its location. Check that it is online and plays the right playlist. | Screens > Add screen |
| Fleet | Reboot, take screenshots and get offline alerts without a site visit | Screens and Alerts |
Finish each stage before the next group of stores starts. A mistake in the location tree costs less to fix with 5 stores than with 200.
Talk to us to plan the hardware, the location tree and the roles for your rollout.